| New file |
| | |
|---|
| | | # Android SDK开发入门文档 |
|---|
| | | |
|---|
| | | 首先在windows安装Android Studio,配置好环境,还要在虚拟机上使用同样的步骤安装Android Studio,虚拟机上安装的AS只有一个功能,就是要使用它的ndk交叉编译libgpiod动态库(在虚拟机上也可以不安装Android Studio,直接下载ndk来交叉编译,方法自行百度,本文档介绍第一种方法),其它工作都在windows上进行,交叉编译完成后,会生成gpio.h头文件和libgpiod.so动态库,在windows系统打开AS,配置项目的CMakeLists.txt文件,导入交叉编译好的libgpiod.so,再导入gpio.h头文件到cpp文件中,就能调用libgpiod库的接口。项目需要用到gpio18,gpio20,gpio22三个引脚,把这三个引脚空闲出来,再给gpiochip0赋予777权限,gpiochip0是管理GPIO0(一组引脚有32个,gpio0-32)这一组的gpio,要控制gpio18,gpio20,gpio22就需要有gpiochip0的操作权限。 |
|---|
| | | |
|---|
| | | **总结以上,开发流程为:安装AS,配置AS环境,连接开发板, 空闲gpio引脚,开gpiochip0权限,使用NDK交叉编译libgpiod,设计UI界面,配置CMakeLists.txt,写JNI,最后编译运行**。 |
|---|
| | | |
|---|
| | | ------ |
|---|
| | | |
|---|
| | | ## 1 Android Studio下的 Java App 开发 |
|---|
| | | |
|---|
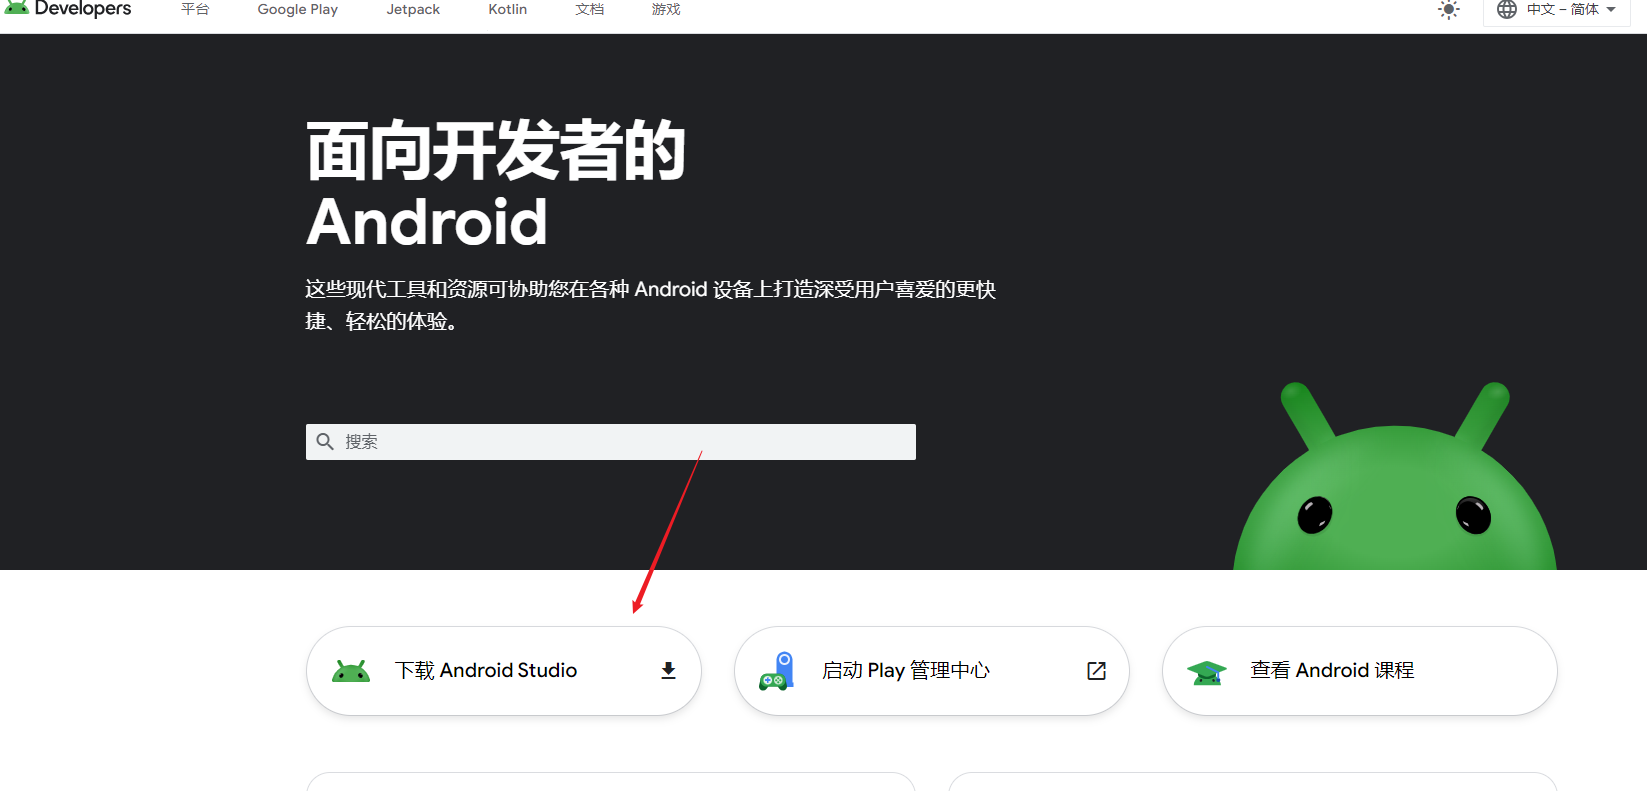
| | | ### 1.1 软件安装 |
|---|
| | | |
|---|
| | | - 下载地址:https://developer.android.com/?hl=zh-cn |
|---|
| | | |
|---|
| | |  |
|---|
| | | |
|---|
| | | - 安装教程:参考博客-[Android Studio 安装配置教程 - Windows(详细版)-CSDN博客](https://blog.csdn.net/qq_38436214/article/details/105073213) |
|---|
| | | |
|---|
| | | ### 1.2 环境配置 |
|---|
| | | |
|---|
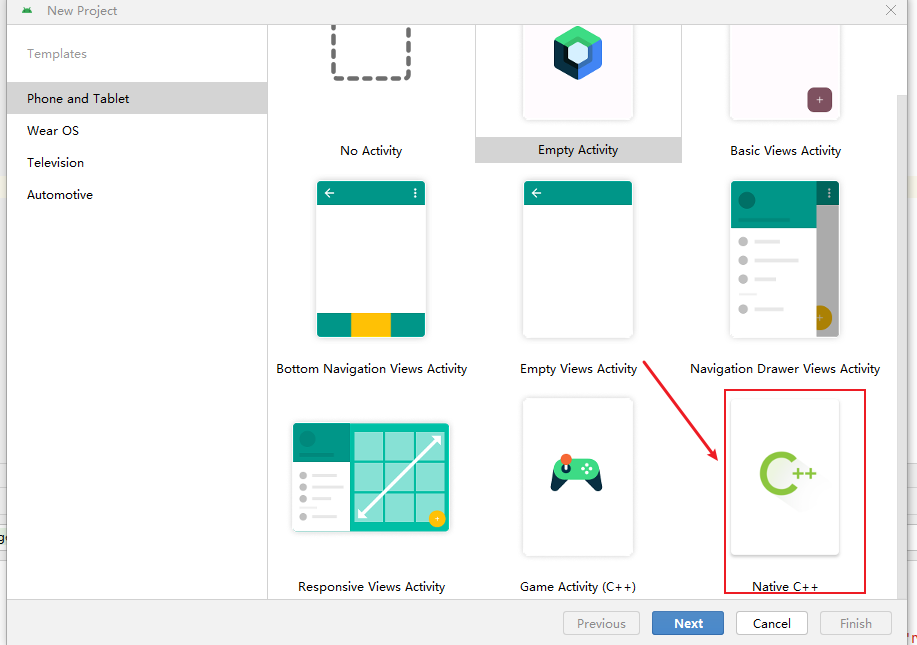
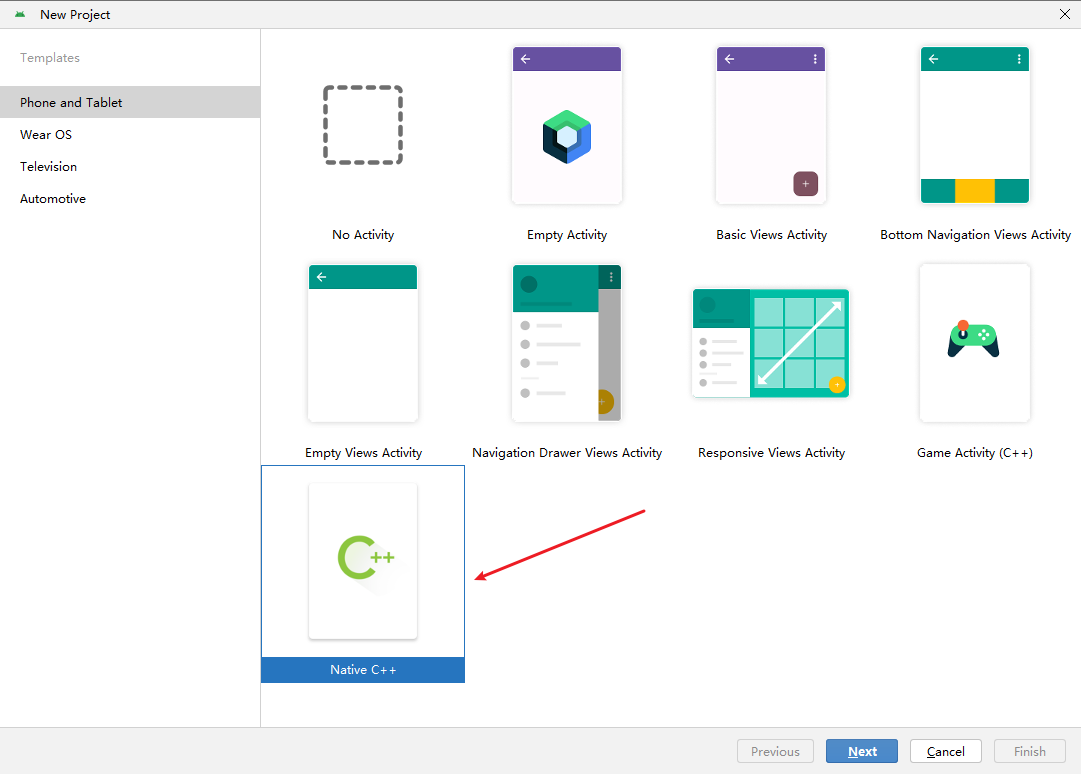
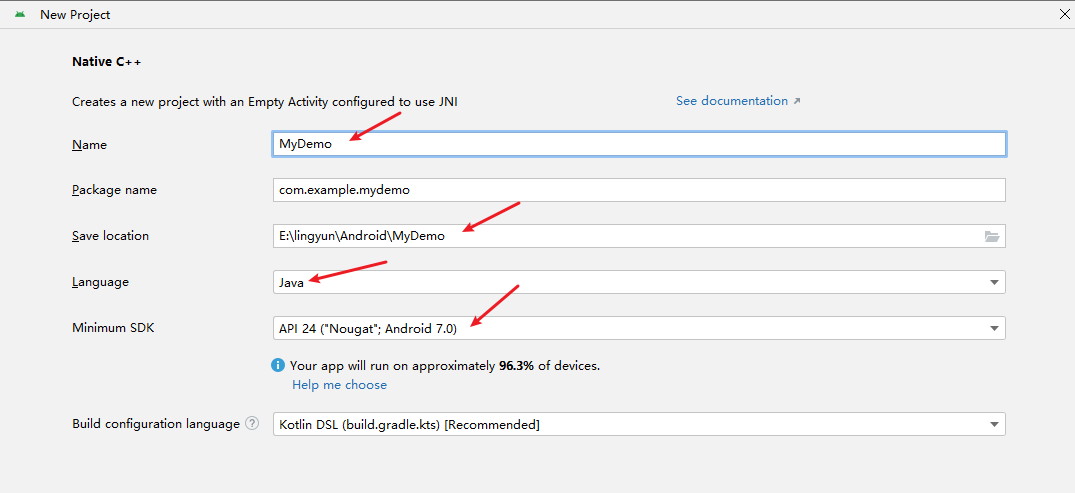
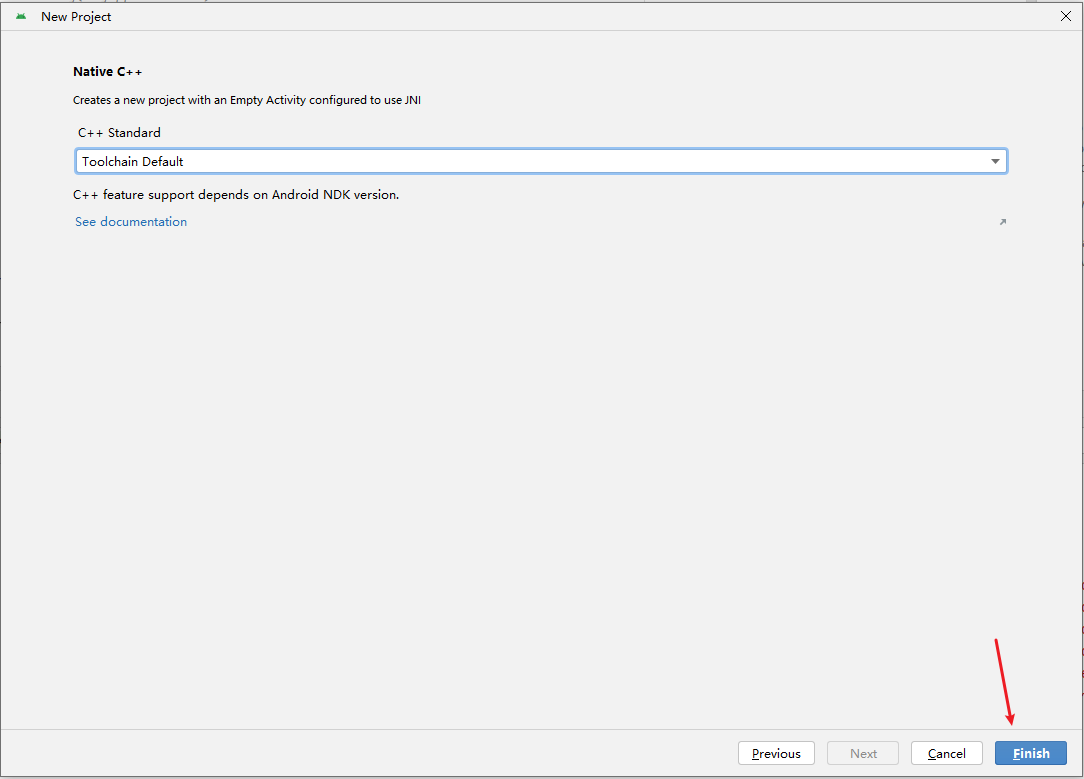
| | | - 首先新建一个项目,选择C++ |
|---|
| | | |
|---|
| | |  |
|---|
| | | |
|---|
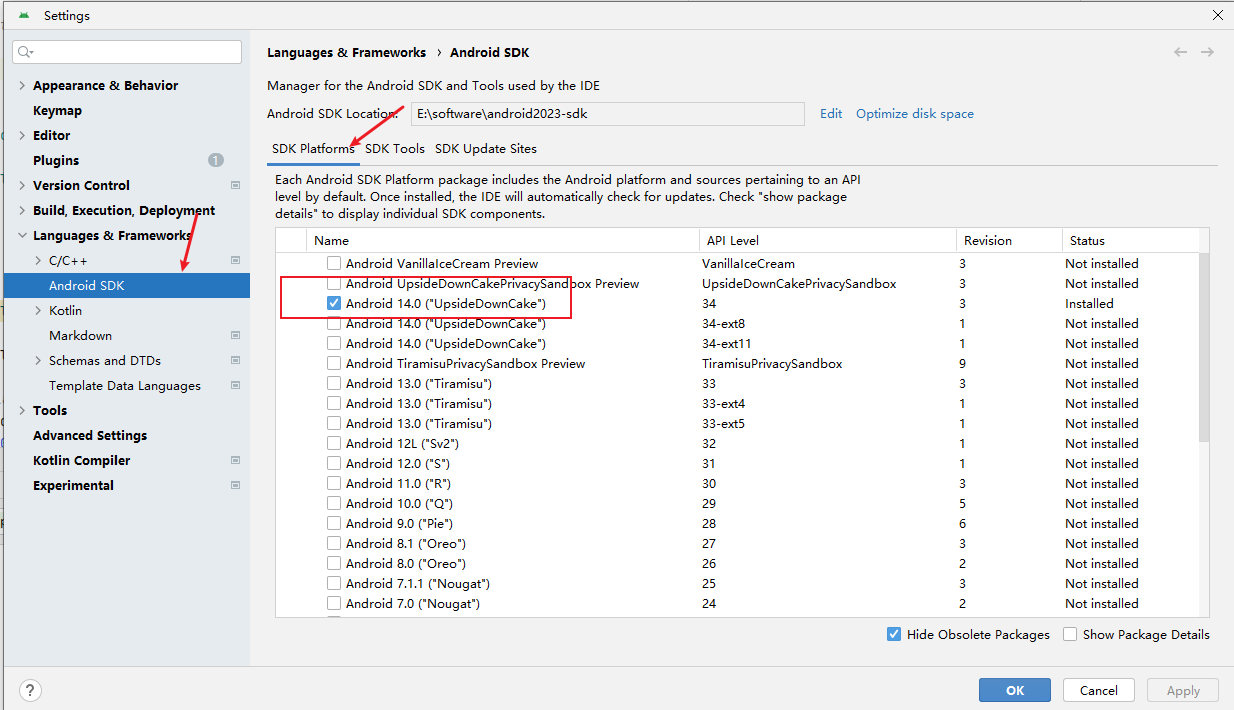
| | | -  |
|---|
| | | |
|---|
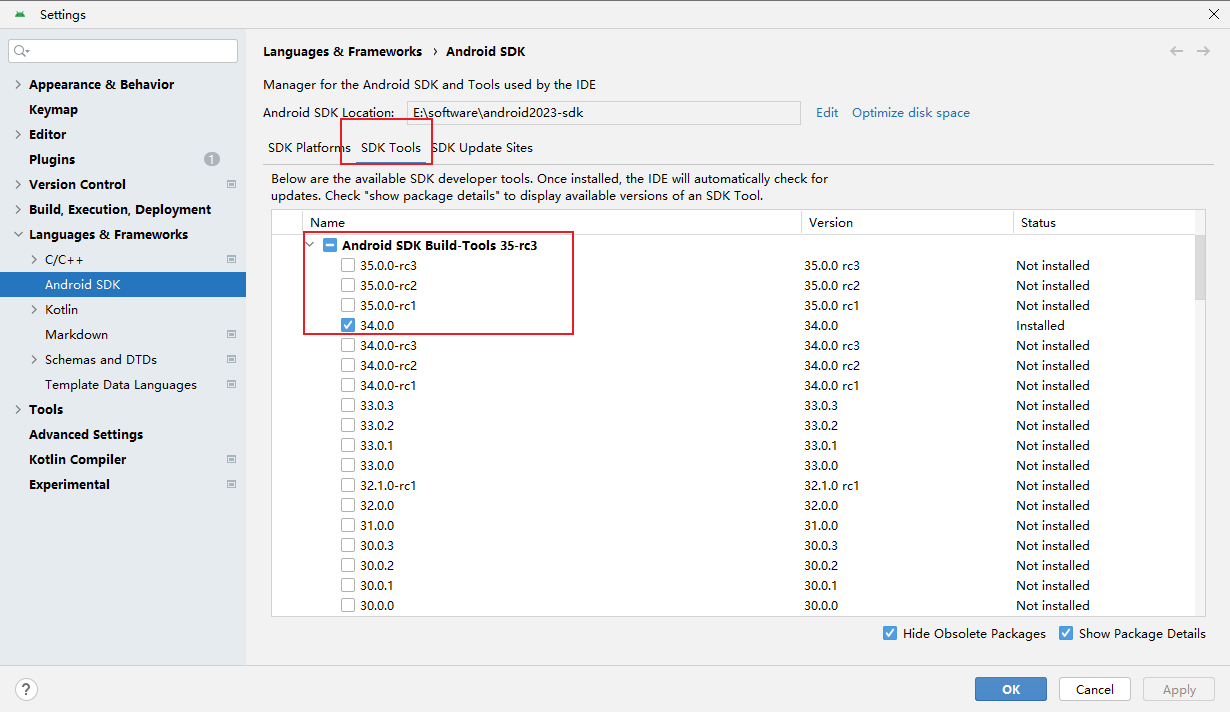
| | | -  |
|---|
| | | |
|---|
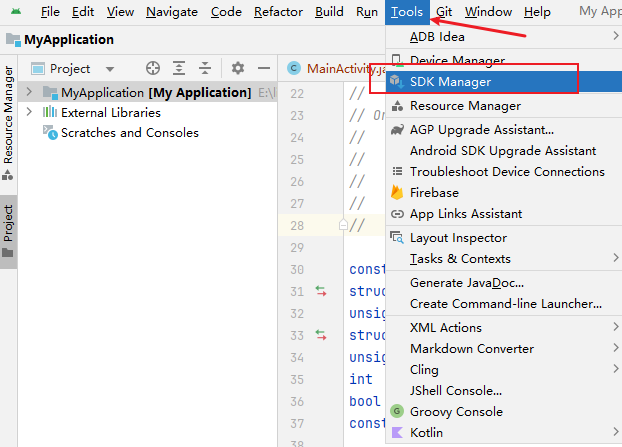
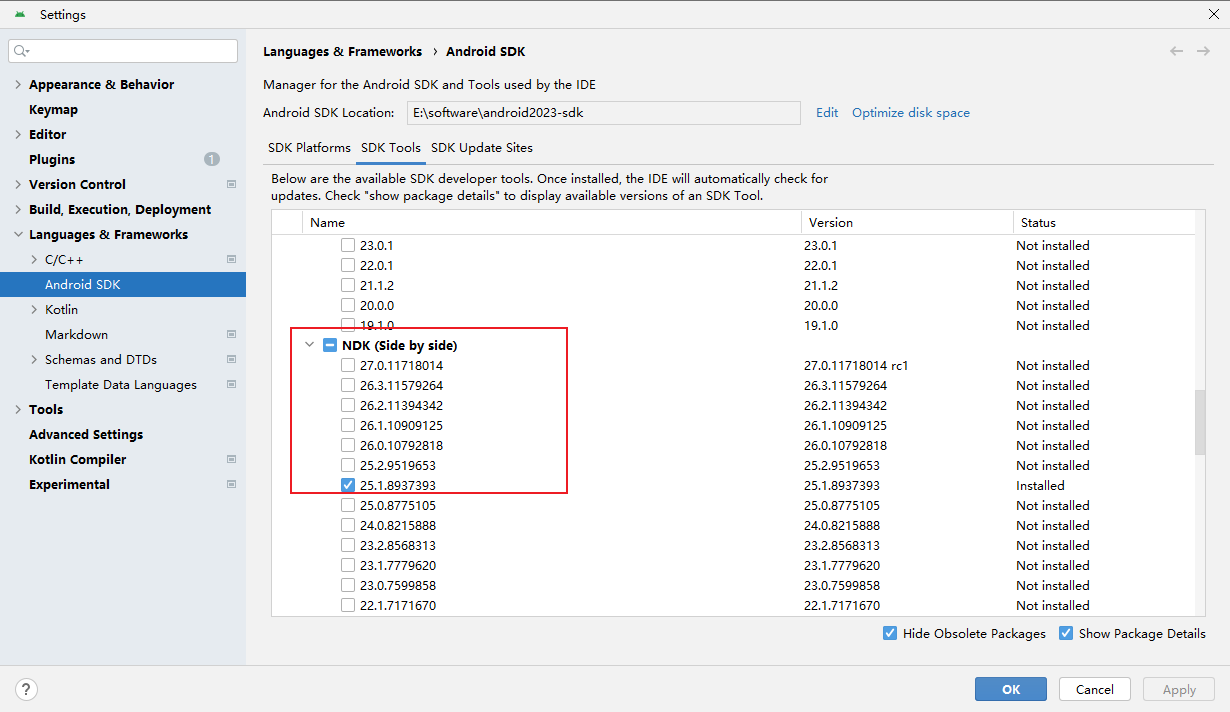
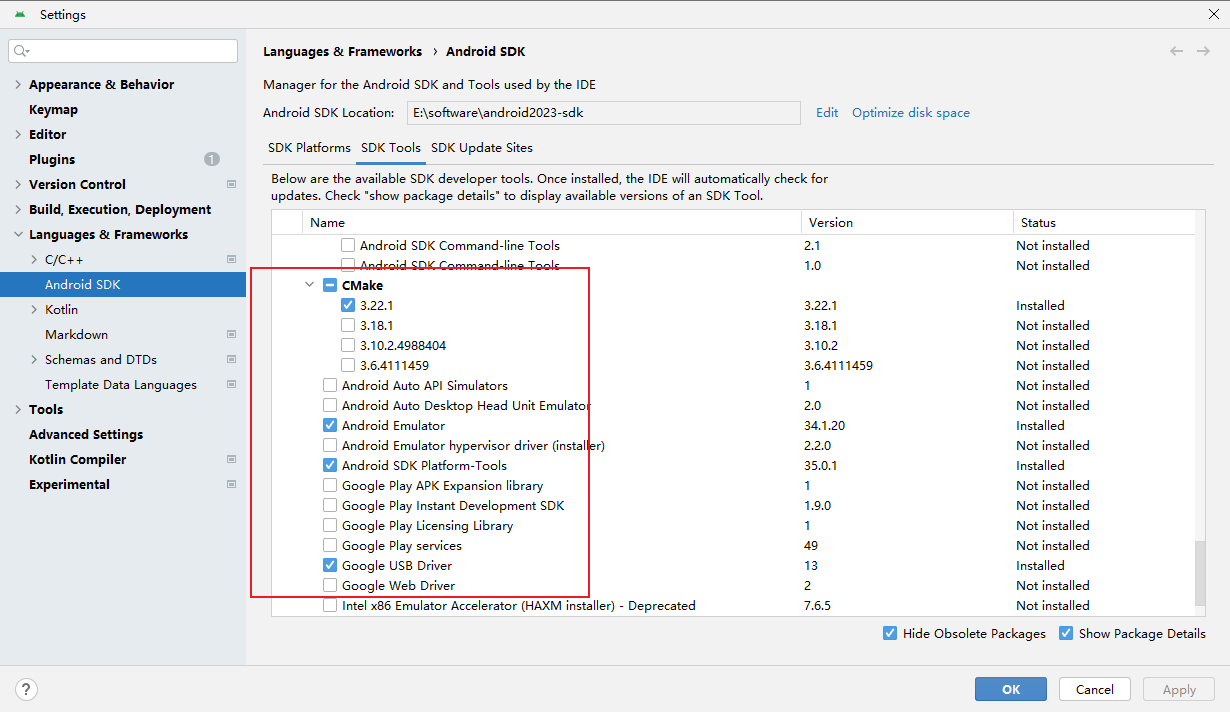
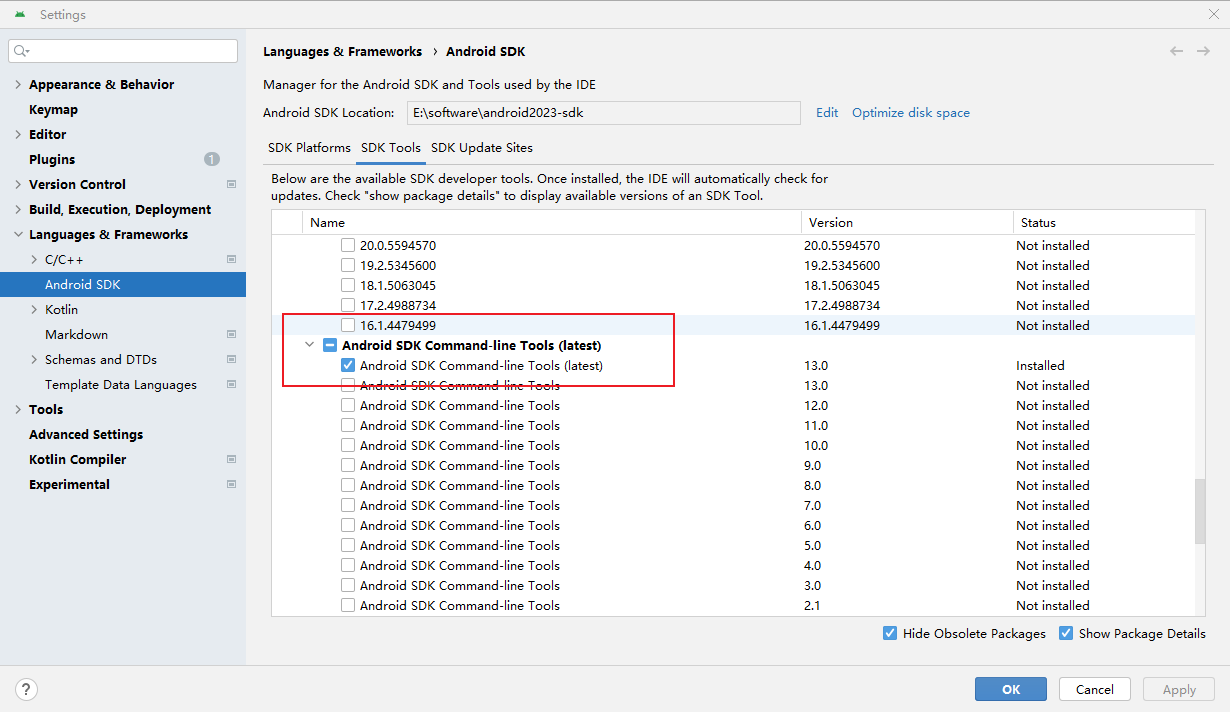
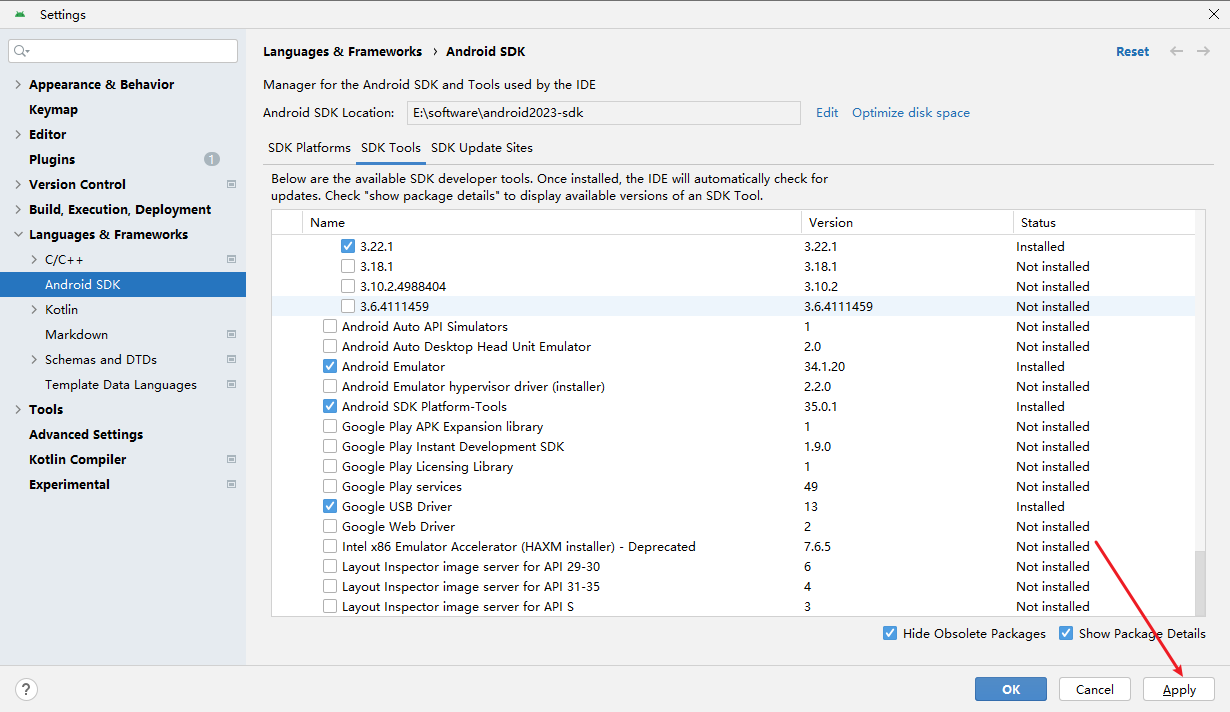
| | | - 安装下载ndk |
|---|
| | | |
|---|
| | |  |
|---|
| | | |
|---|
| | |  |
|---|
| | | |
|---|
| | |  |
|---|
| | | |
|---|
| | |  |
|---|
| | | |
|---|
| | |  |
|---|
| | | |
|---|
| | |  |
|---|
| | | |
|---|
| | |  |
|---|
| | | |
|---|
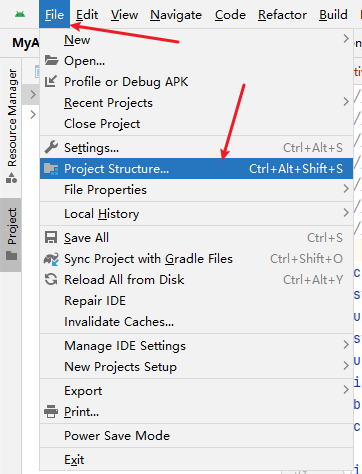
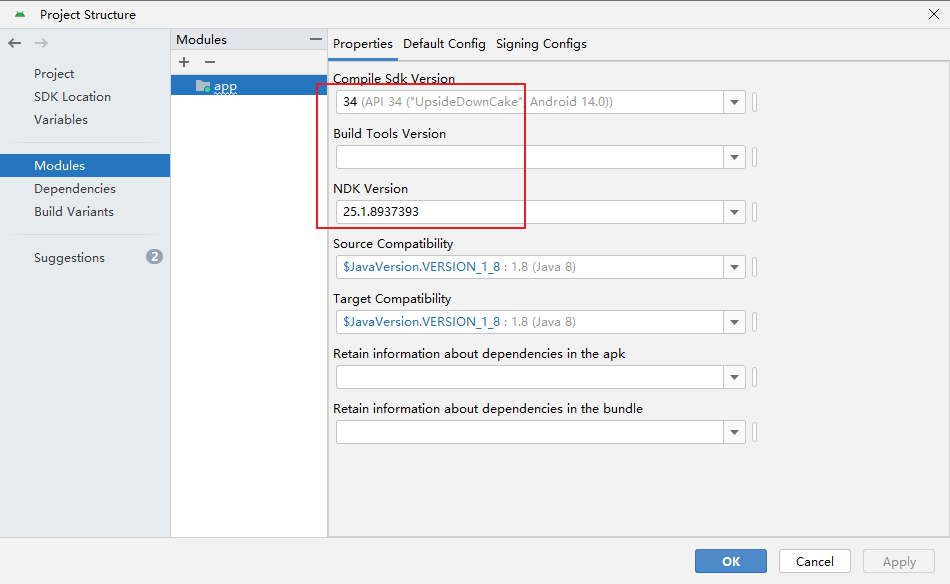
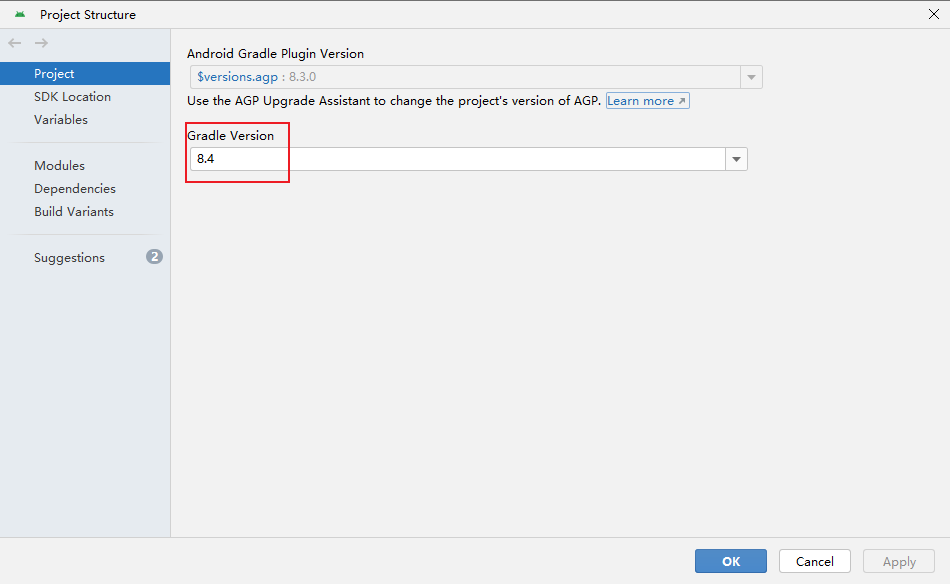
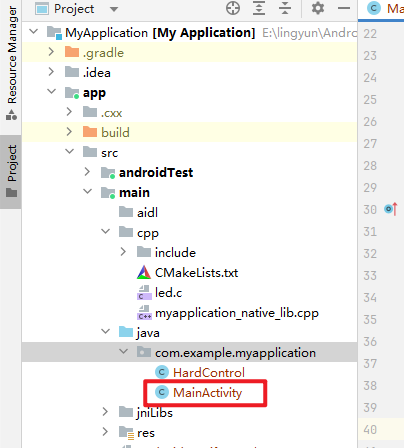
| | | - 查看自己的项目结构 |
|---|
| | | |
|---|
| | |  |
|---|
| | | |
|---|
| | |  |
|---|
| | | |
|---|
| | |  |
|---|
| | | |
|---|
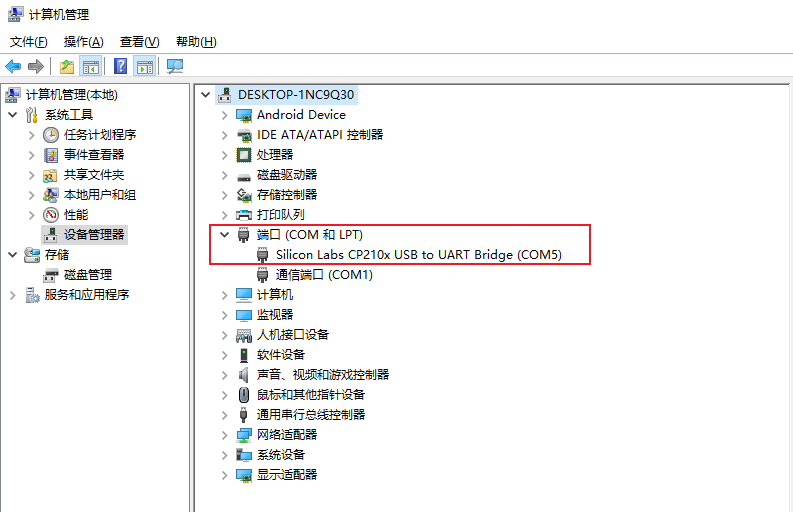
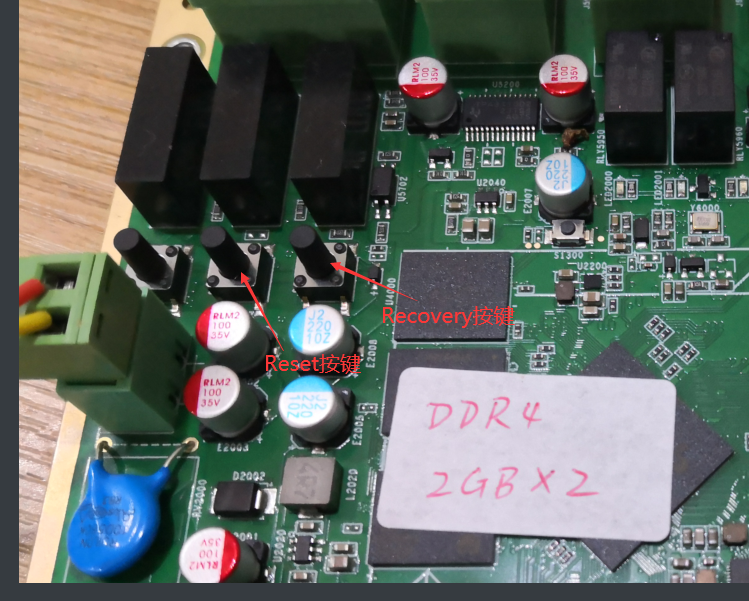
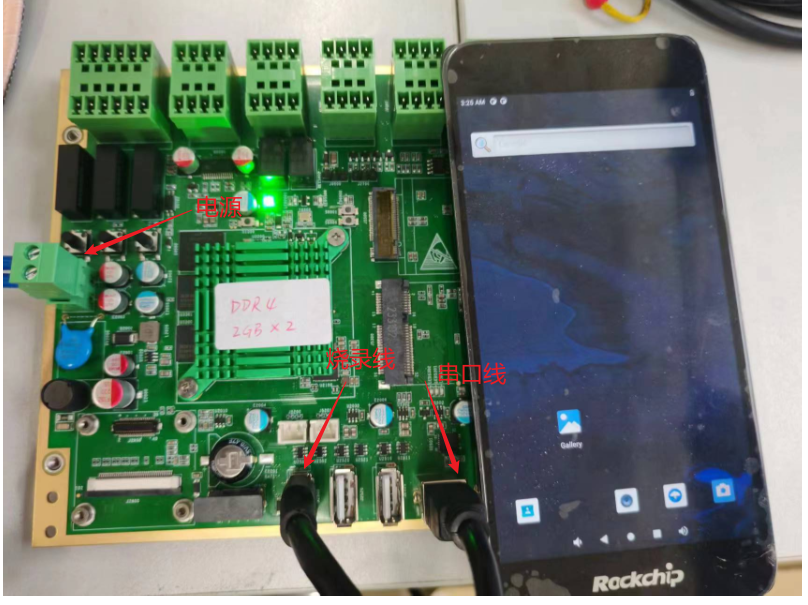
| | | ### 1.3 硬件连接 |
|---|
| | | |
|---|
| | |  |
|---|
| | | |
|---|
| | | - **烧录软件下载** |
|---|
| | | |
|---|
| | | 从凌云实验室文件服务器上下载并安装下面烧录软件。 |
|---|
| | | |
|---|
| | | 1、[CP210x_VCP_Windows.zip](http://studio.iot-yun.club:2211/rockchip/tools/CP210x_VCP_Windows.zip) 解压缩并安装开发板的Console调试串口驱动; |
|---|
| | | |
|---|
| | | 2、[DriverAssitant_v5.1.1.zip](http://studio.iot-yun.club:2211/rockchip/tools/DriverAssitant_v5.1.1.zip) , 解压缩安装RK3568开发板驱动; |
|---|
| | | |
|---|
| | | 3、[RKDevTool_Release_v2.86.zip](http://studio.iot-yun.club:2211/rockchip/tools/RKDevTool_Release_v2.86.zip) ,直接解压缩即可运行的 RK3568开发板烧录软件; |
|---|
| | | |
|---|
| | |  |
|---|
| | | |
|---|
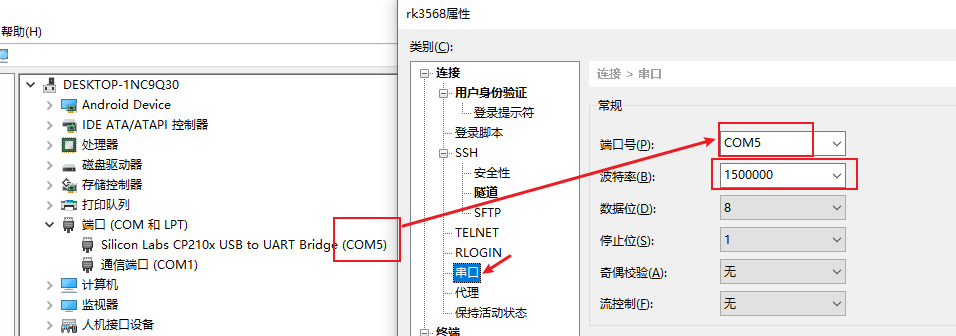
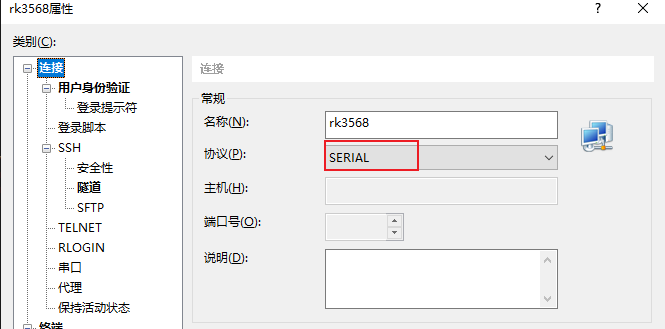
| | | - **xshell软件,串口连接** |
|---|
| | | |
|---|
| | |  |
|---|
| | | |
|---|
| | |  |
|---|
| | | |
|---|
| | |  |
|---|
| | | |
|---|
| | | - 在这两个窗口管理开发板连接 |
|---|
| | | |
|---|
| | |  |
|---|
| | | |
|---|
| | | ### 1.4 UI界面设计 |
|---|
| | | |
|---|
| | | |
|---|
| | | |
|---|
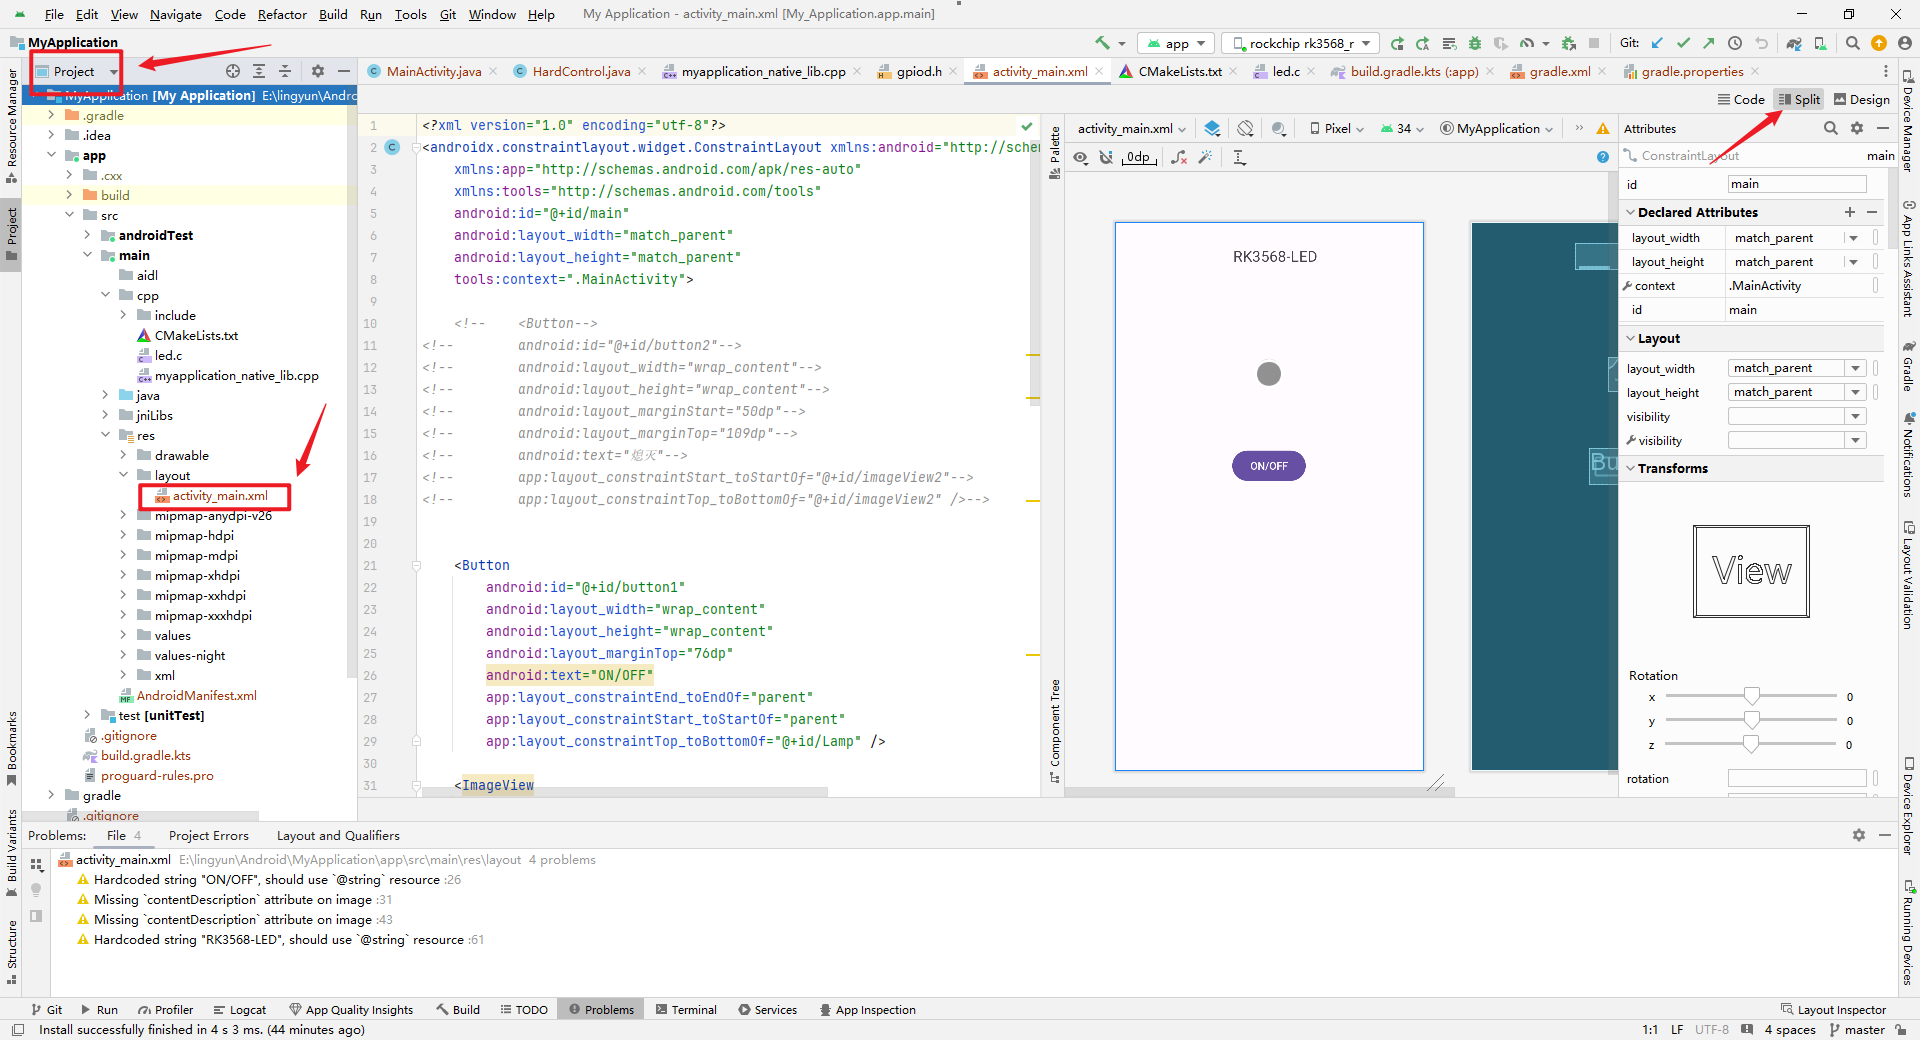
| | | #### 1.4.1 **切换Project视图,代码文件名为activity_main.xml** |
|---|
| | | |
|---|
| | |  |
|---|
| | | |
|---|
| | | - **activity_main.xml**代码: |
|---|
| | | |
|---|
| | | ```xml |
|---|
| | | <?xml version="1.0" encoding="utf-8"?> |
|---|
| | | <androidx.constraintlayout.widget.ConstraintLayout xmlns:android="http://schemas.android.com/apk/res/android" |
|---|
| | | xmlns:app="http://schemas.android.com/apk/res-auto" |
|---|
| | | xmlns:tools="http://schemas.android.com/tools" |
|---|
| | | android:id="@+id/main" |
|---|
| | | android:layout_width="match_parent" |
|---|
| | | android:layout_height="match_parent" |
|---|
| | | tools:context=".MainActivity"> |
|---|
| | | |
|---|
| | | |
|---|
| | | <Button |
|---|
| | | android:id="@+id/button1" |
|---|
| | | android:layout_width="wrap_content" |
|---|
| | | android:layout_height="wrap_content" |
|---|
| | | android:layout_marginTop="76dp" |
|---|
| | | android:text="ON/OFF" |
|---|
| | | app:layout_constraintEnd_toEndOf="parent" |
|---|
| | | app:layout_constraintStart_toStartOf="parent" |
|---|
| | | app:layout_constraintTop_toBottomOf="@+id/Lamp" /> |
|---|
| | | |
|---|
| | | <ImageView |
|---|
| | | android:id="@+id/imageView2" |
|---|
| | | android:layout_width="45dp" |
|---|
| | | android:layout_height="45dp" |
|---|
| | | android:layout_marginTop="180dp" |
|---|
| | | android:visibility="visible" |
|---|
| | | app:layout_constraintEnd_toEndOf="parent" |
|---|
| | | app:layout_constraintHorizontal_bias="0.5" |
|---|
| | | app:layout_constraintStart_toStartOf="parent" |
|---|
| | | app:layout_constraintTop_toTopOf="parent" |
|---|
| | | app:srcCompat="@android:drawable/presence_invisible" /> |
|---|
| | | |
|---|
| | | <ImageView |
|---|
| | | android:id="@+id/Lamp" |
|---|
| | | android:layout_width="45dp" |
|---|
| | | android:layout_height="45dp" |
|---|
| | | android:layout_marginTop="180dp" |
|---|
| | | android:visibility="invisible" |
|---|
| | | app:layout_constraintEnd_toEndOf="parent" |
|---|
| | | app:layout_constraintHorizontal_bias="0.5" |
|---|
| | | app:layout_constraintStart_toStartOf="parent" |
|---|
| | | app:layout_constraintTop_toTopOf="parent" |
|---|
| | | app:srcCompat="@android:drawable/presence_online" /> |
|---|
| | | |
|---|
| | | |
|---|
| | | <TextView |
|---|
| | | android:id="@+id/textView" |
|---|
| | | android:layout_width="150dp" |
|---|
| | | android:layout_height="35dp" |
|---|
| | | android:gravity="center" |
|---|
| | | android:text="RK3568-LED" |
|---|
| | | android:textSize="20sp" |
|---|
| | | app:layout_constraintBottom_toBottomOf="parent" |
|---|
| | | app:layout_constraintEnd_toEndOf="parent" |
|---|
| | | app:layout_constraintHorizontal_bias="0.532" |
|---|
| | | app:layout_constraintStart_toStartOf="parent" |
|---|
| | | app:layout_constraintTop_toTopOf="parent" |
|---|
| | | app:layout_constraintVertical_bias="0.04" /> |
|---|
| | | |
|---|
| | | |
|---|
| | | </androidx.constraintlayout.widget.ConstraintLayout> |
|---|
| | | ``` |
|---|
| | | |
|---|
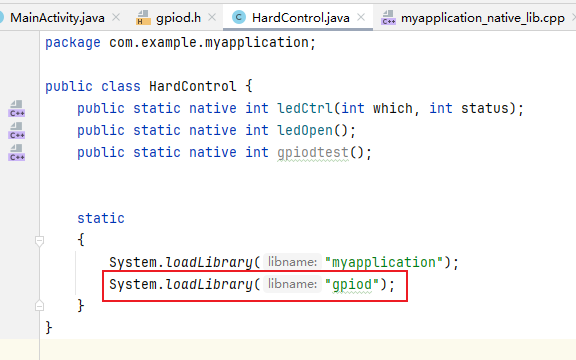
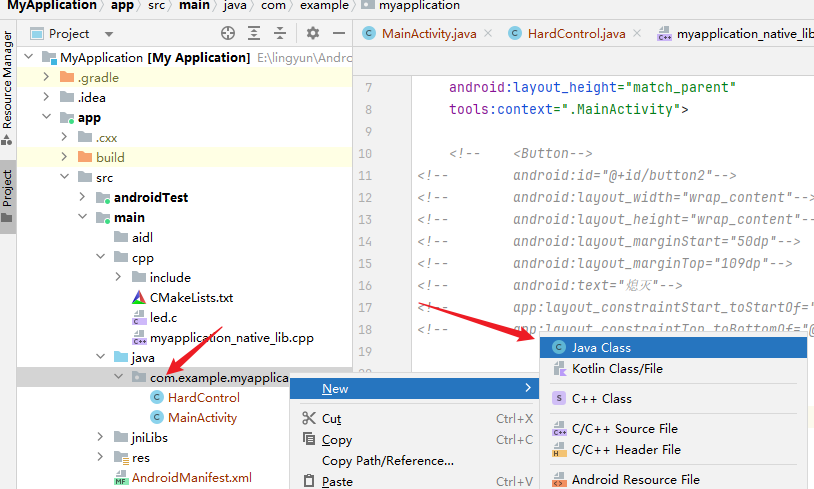
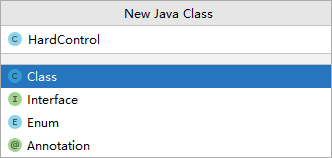
| | | #### 1.4.2 **在java文件夹下新建一个HardControl类** |
|---|
| | | |
|---|
| | | - 用于放函数接口 |
|---|
| | | |
|---|
| | |  |
|---|
| | | |
|---|
| | | |
|---|
| | | |
|---|
| | |  |
|---|
| | | |
|---|
| | | - HardControl.java: |
|---|
| | | |
|---|
| | | ```java |
|---|
| | | package com.example.myapplication; |
|---|
| | | |
|---|
| | | public class HardControl { |
|---|
| | | |
|---|
| | | public static native int ledOpen();//打开设备 |
|---|
| | | public static native int ledCtrl_on(int which, int status);//打开led灯 |
|---|
| | | public static native int ledCtrl_off(int which, int status);//关闭led灯 |
|---|
| | | |
|---|
| | | static |
|---|
| | | { |
|---|
| | | System.loadLibrary("myapplication"); |
|---|
| | | System.loadLibrary("gpiod"); |
|---|
| | | } |
|---|
| | | } |
|---|
| | | |
|---|
| | | ``` |
|---|
| | | |
|---|
| | | #### 1.4.3 编写MainActivity.java |
|---|
| | | |
|---|
| | | - MainActivity.java相当于c语言的main函数 |
|---|
| | | |
|---|
| | |  |
|---|
| | | |
|---|
| | | - **MainActivity.java** |
|---|
| | | |
|---|
| | | ```java |
|---|
| | | package com.example.myapplication; |
|---|
| | | |
|---|
| | | import android.os.Bundle; |
|---|
| | | import android.view.View; |
|---|
| | | import android.widget.Button; |
|---|
| | | import android.widget.ImageView; |
|---|
| | | import androidx.appcompat.app.AppCompatActivity; |
|---|
| | | |
|---|
| | | |
|---|
| | | public class MainActivity extends AppCompatActivity implements View.OnClickListener{ |
|---|
| | | |
|---|
| | | ImageView L1; |
|---|
| | | Button bnt1; |
|---|
| | | boolean isLightOn = false; // 指示灯状态 |
|---|
| | | HardControl hardControl = new HardControl(); |
|---|
| | | |
|---|
| | | |
|---|
| | | @Override |
|---|
| | | protected void onCreate(Bundle savedInstanceState) { |
|---|
| | | super.onCreate(savedInstanceState); |
|---|
| | | setContentView(R.layout.activity_main); |
|---|
| | | bnt1 = findViewById(R.id.button1);// 按钮灯开 |
|---|
| | | |
|---|
| | | hardControl.ledOpen(); |
|---|
| | | bnt1.setOnClickListener(this); |
|---|
| | | L1 = (ImageView)this.findViewById(R.id.Lamp); |
|---|
| | | } |
|---|
| | | |
|---|
| | | @Override |
|---|
| | | public void onClick(View view) { |
|---|
| | | |
|---|
| | | |
|---|
| | | int i=view.getId(); |
|---|
| | | |
|---|
| | | if (i==bnt1.getId()) |
|---|
| | | { |
|---|
| | | if(isLightOn) |
|---|
| | | { |
|---|
| | | L1.setVisibility(View.INVISIBLE); |
|---|
| | | hardControl.ledCtrl_off(1,1); |
|---|
| | | isLightOn = false; |
|---|
| | | } |
|---|
| | | else |
|---|
| | | { |
|---|
| | | L1.setVisibility(View.VISIBLE); |
|---|
| | | hardControl.ledCtrl_on(1,0); |
|---|
| | | isLightOn = true; |
|---|
| | | } |
|---|
| | | } |
|---|
| | | } |
|---|
| | | protected void onDestroy() { |
|---|
| | | super.onDestroy(); |
|---|
| | | // 当Activity销毁时,关闭LED控制 |
|---|
| | | hardControl.ledCtrl_close(); |
|---|
| | | } |
|---|
| | | |
|---|
| | | } |
|---|
| | | ``` |
|---|
| | | |
|---|
| | | ------ |
|---|
| | | |
|---|
| | | ## 2 Android Framwork/JNI层的开发 |
|---|
| | | |
|---|
| | | ### 2.1 交叉编译libgpiod |
|---|
| | | |
|---|
| | | ```bash |
|---|
| | | #下载安装相关编译工具 |
|---|
| | | sudo apt update |
|---|
| | | sudo apt-get install autoconf-archive |
|---|
| | | sudo apt-get install autoconf automake libtool |
|---|
| | | ``` |
|---|
| | | |
|---|
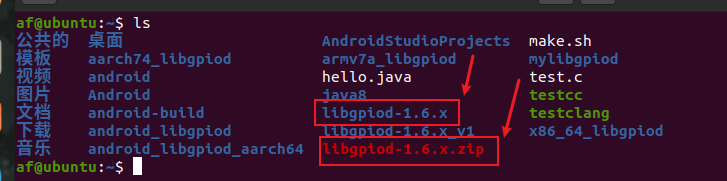
| | | #### 2.1.1**下载源码然后解压** |
|---|
| | | |
|---|
| | | - 源码地址:https://github.com/brgl/libgpiod/tree/v1.6.x |
|---|
| | | |
|---|
| | | ```bash |
|---|
| | | git clone https://github.com/brgl/libgpiod/tree/v1.6.x |
|---|
| | | unzip libgpiod-1.6.x.zip |
|---|
| | | ``` |
|---|
| | | |
|---|
| | |  |
|---|
| | | |
|---|
| | | #### 2.1.2 运行脚本 |
|---|
| | | |
|---|
| | | ```bash |
|---|
| | | cd libgpiod-1.6.x |
|---|
| | | bash autogen.sh #运行脚本,会生成configure这个文件 |
|---|
| | | ``` |
|---|
| | | |
|---|
| | |  |
|---|
| | | |
|---|
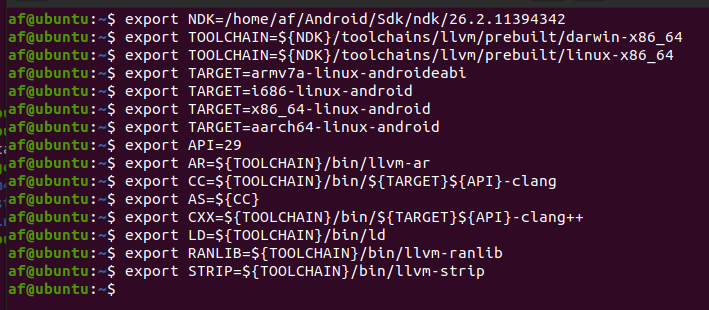
| | | #### 2.1.3 设置交叉编译环境变量 |
|---|
| | | |
|---|
| | | - 首先安装AS,我的安装目录为/home/af/Android/ |
|---|
| | | |
|---|
| | | **(重点,环境变量没设置对交叉编译会失败)** |
|---|
| | | |
|---|
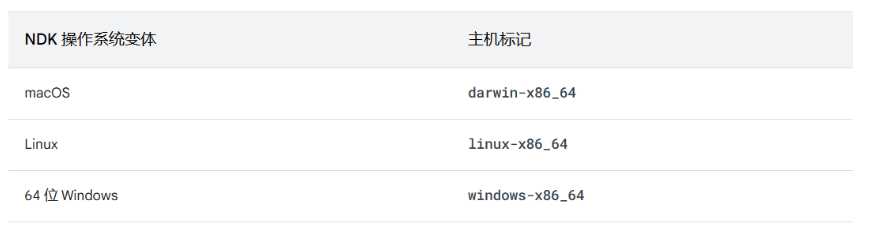
| | | ```bash |
|---|
| | | export NDK=/home/af/Android/Sdk/ndk/26.2.11394342 # 根据自己的NDK路径设置 |
|---|
| | | #export TOOLCHAIN=${NDK}/toolchains/llvm/prebuilt/darwin-x86_64 |
|---|
| | | export TOOLCHAIN=${NDK}/toolchains/llvm/prebuilt/linux-x86_64 |
|---|
| | | #export TARGET=armv7a-linux-androideabi |
|---|
| | | #export TARGET=i686-linux-android |
|---|
| | | #export TARGET=x86_64-linux-android |
|---|
| | | export TARGET=aarch64-linux-android #TARGET=aarch64-linux-android 是我们选择的交叉编译的目标架构,根据需要选择不通的架构 |
|---|
| | | export API=29 |
|---|
| | | export AR=${TOOLCHAIN}/bin/llvm-ar #打包器,用于库操作,可以通过该工具从一个库中删除或者增加目标代码模块。 |
|---|
| | | export CC=${TOOLCHAIN}/bin/${TARGET}${API}-clang # 编译器,对C源文件进行编译处理,生成汇编文件。 |
|---|
| | | export AS=${CC} #汇编器,将汇编文件生成目标文件(汇编文件使用的是指令助记符, AS将它翻译成机器码) |
|---|
| | | export CXX=${TOOLCHAIN}/bin/${TARGET}${API}-clang++ |
|---|
| | | export LD=${TOOLCHAIN}/bin/ld #链接器,为前面生成的目标代码分配地址空间,将多个目标文件链接成一个库或者是可执行文件。 |
|---|
| | | export RANLIB=${TOOLCHAIN}/bin/llvm-ranlib |
|---|
| | | export STRIP=${TOOLCHAIN}/bin/llvm-strip # 以最终生成的可执行文件或者库文件作为输入,然后消除掉其中的源码。 |
|---|
| | | ``` |
|---|
| | | |
|---|
| | |  |
|---|
| | | |
|---|
| | | ```markdown |
|---|
| | | "aarch64-linux-android29-clang" 是一个基于 Clang 编译器的工具链,用于在 Android 平台上编译 ARMv8 架构的代码。它的主要特点包括: |
|---|
| | | |
|---|
| | | 1、支持使用 LLVM/Clang 编译器进行编译,具有优秀的代码优化能力和兼容性; |
|---|
| | | 2、支持 ARMv8 架构指令集,可以生成针对 ARMv8 架构的优化代码; |
|---|
| | | 3、针对 Android 平台进行了优化,可以使用 Android 平台上的系统库和头文件; |
|---|
| | | 4、适用于 Android 9.0 及以上版本(API level 29)。 |
|---|
| | | 5、使用该工具链可以在 Android 平台上编译出高效、稳定、兼容性好的 ARMv8 架构代码,适用于开发 Android 平台上的应用程序和系统级组件。 |
|---|
| | | ``` |
|---|
| | | |
|---|
| | |  |
|---|
| | | |
|---|
| | | #### 2.1.4 在源码目录下运行上一步生成的configure脚本,生成Makefile文件 |
|---|
| | | |
|---|
| | | ```bash |
|---|
| | | sudo ./configure CC=${CC} CXX=${CXX} RANLIB=${RANLIB} AR=${AR} STRIP=${STRIP} --prefix=/home/af/android_libgpiod --host=${TARGET} |
|---|
| | | |
|---|
| | | # --prefix指定安装目录 |
|---|
| | | ``` |
|---|
| | | |
|---|
| | |  |
|---|
| | | |
|---|
| | | #### 2.1.5 使用make命令,运行Makefile文件,再安装 |
|---|
| | | |
|---|
| | | ```bash |
|---|
| | | sudo make |
|---|
| | | sudo make install |
|---|
| | | ``` |
|---|
| | | |
|---|
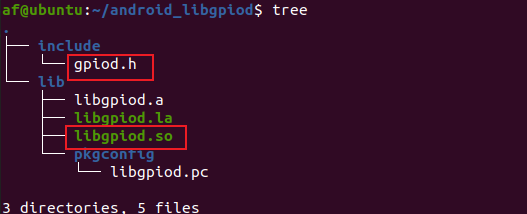
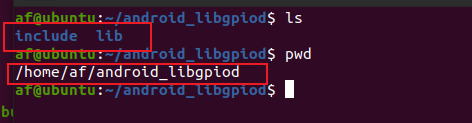
| | | - 我的库文件和头文件安装到了这里,就是之前--prefix指定的目录 |
|---|
| | | |
|---|
| | |  |
|---|
| | | |
|---|
| | | - 我们只要生成的头文件和动态库,拷贝这两个文件 |
|---|
| | | |
|---|
| | |  |
|---|
| | | |
|---|
| | | - 用file命令查看文件类型,看到这个输出表示交叉编译成功,否则重新编译 |
|---|
| | | |
|---|
| | |  |
|---|
| | | |
|---|
| | | ------ |
|---|
| | | |
|---|
| | | ### 2.2 java加载交叉编译的libgpiod.so |
|---|
| | | |
|---|
| | | #### 2.2.1 新建C++项目 |
|---|
| | | |
|---|
| | |  |
|---|
| | | |
|---|
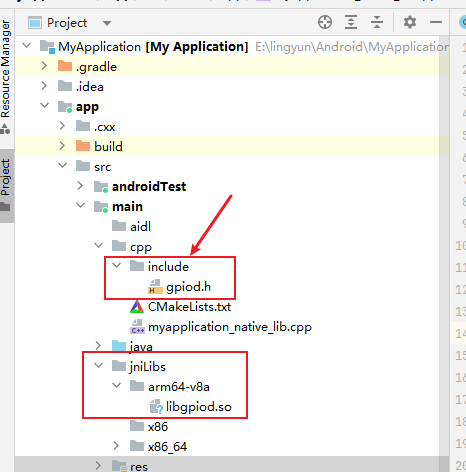
| | | #### 2.2.2 新建目录,将头文件和动态库复制进去,目录结构如图所示 |
|---|
| | | |
|---|
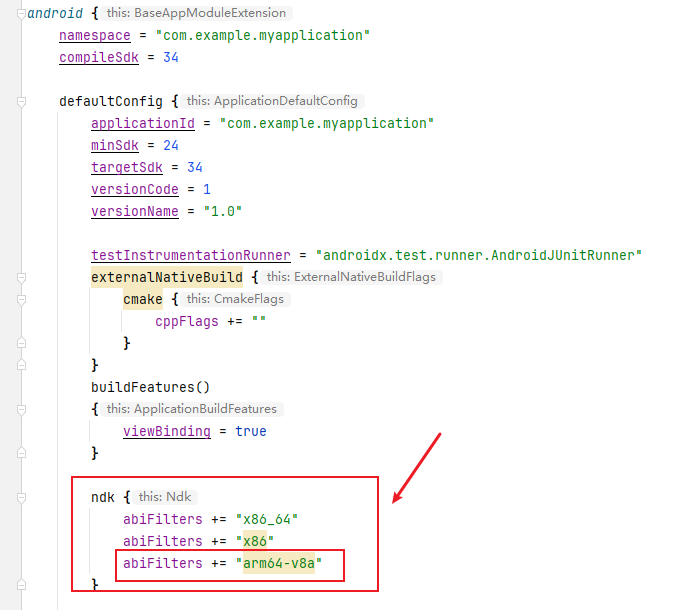
| | | - 安卓设备架构为arm64-v8a,就新建为arm64-v8a |
|---|
| | | |
|---|
| | |  |
|---|
| | | |
|---|
| | | |
|---|
| | | |
|---|
| | | #### 2.2.3 修改CMakeLists.txt文件,导入、链接库 |
|---|
| | | |
|---|
| | | ```markdown |
|---|
| | | ########导入libgpiod########### |
|---|
| | | |
|---|
| | | #在CMakeLists.txt文件中添加一个导入库(imported library)的声明, |
|---|
| | | #IMPORTED: 这是一个可选的参数,表示库是一个导入库(imported library),即该库不是由CMake构建生成的,而是由外部提供的。 |
|---|
| | | add_library(libgpiod |
|---|
| | | SHARED |
|---|
| | | IMPORTED) |
|---|
| | | |
|---|
| | | set_target_properties( libgpiod |
|---|
| | | PROPERTIES IMPORTED_LOCATION |
|---|
| | | ${CMAKE_SOURCE_DIR}/../jniLibs/${CMAKE_ANDROID_ARCH_ABI}/libgpiod.so) |
|---|
| | | |
|---|
| | | target_link_libraries(${CMAKE_PROJECT_NAME} |
|---|
| | | # List libraries link to the target library |
|---|
| | | ${log-lib} |
|---|
| | | libgpiod |
|---|
| | | ) |
|---|
| | | ``` |
|---|
| | | |
|---|
| | | #### 2.2.4 修改build.gradle.kts文件,添加如下内容 |
|---|
| | | |
|---|
| | |  |
|---|
| | | |
|---|
| | | #### 2.2.5 导入加载libgpiod库 |
|---|
| | | |
|---|
| | |  |
|---|
| | | |
|---|
| | | ------ |
|---|
| | | |
|---|
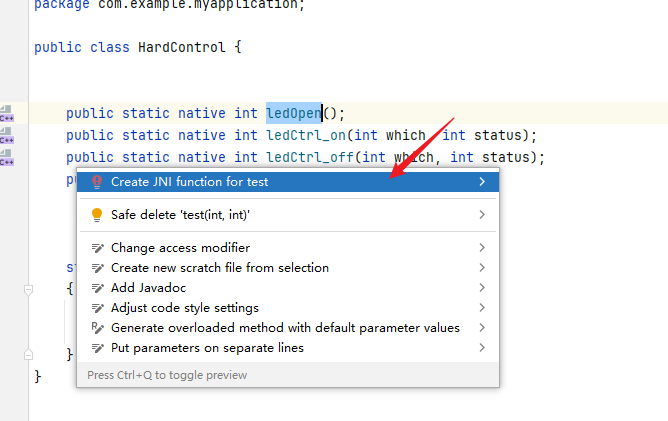
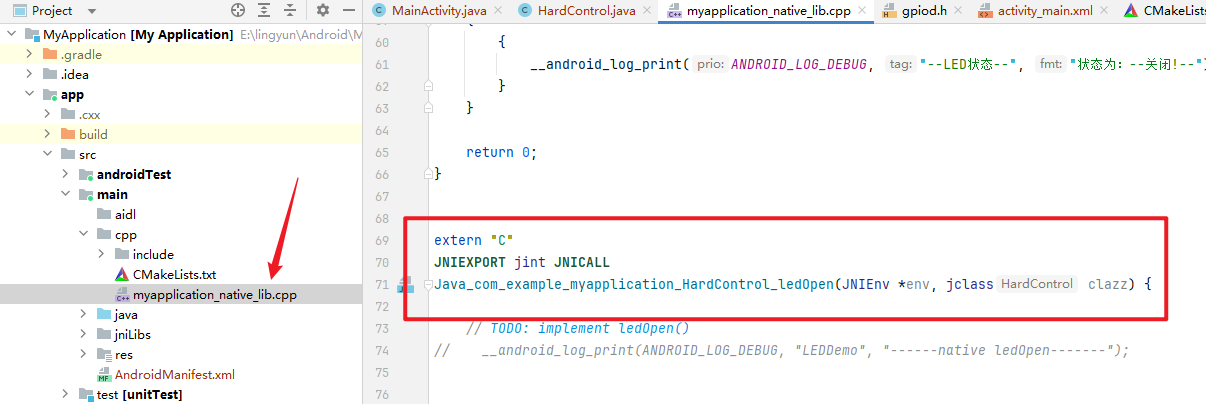
| | | ### 2.3 JNI编写 |
|---|
| | | |
|---|
| | | **ledOpen ledCtrl_on ledCtrl_off是JNI接口**,鼠标选中函数名,按alt+enter键,点击Create JNI...,然后会在cpp文件里自动生成JNI函数接口名,在里面写代码 |
|---|
| | | |
|---|
| | |  |
|---|
| | | |
|---|
| | |  |
|---|
| | | |
|---|
| | | - myapplication.cpp (记得导入头文件include/gpiod.h) |
|---|
| | | |
|---|
| | | ```cpp |
|---|
| | | #include <jni.h> |
|---|
| | | #include <string> |
|---|
| | | #include <android/log.h> |
|---|
| | | #include <sys/types.h> |
|---|
| | | #include <sys/stat.h> |
|---|
| | | #include <fcntl.h> |
|---|
| | | #include <sys/ioctl.h> |
|---|
| | | #include <unistd.h> |
|---|
| | | #include <sys/select.h> |
|---|
| | | #include "include/gpiod.h" |
|---|
| | | |
|---|
| | | // Write C++ code here. |
|---|
| | | // |
|---|
| | | // Do not forget to dynamically load the C++ library into your application. |
|---|
| | | // |
|---|
| | | // For instance, |
|---|
| | | // |
|---|
| | | // In MainActivity.java: |
|---|
| | | // static { |
|---|
| | | // System.loadLibrary("myapplication"); |
|---|
| | | // } |
|---|
| | | // |
|---|
| | | // Or, in MainActivity.kt: |
|---|
| | | // companion object { |
|---|
| | | // init { |
|---|
| | | // System.loadLibrary("myapplication") |
|---|
| | | // } |
|---|
| | | // } |
|---|
| | | |
|---|
| | | const char *chipname = "gpiochip0"; //GPIO1 |
|---|
| | | struct gpiod_chip *chip; |
|---|
| | | unsigned int line_num ; |
|---|
| | | struct gpiod_line *line18 ; |
|---|
| | | unsigned int line_num_18 = 18; // 偏移GPIO 20 GPIO1_20 |
|---|
| | | int ret; |
|---|
| | | bool isused; |
|---|
| | | const char *chip_name; |
|---|
| | | |
|---|
| | | int set_led_value(int status) |
|---|
| | | { |
|---|
| | | __android_log_print(ANDROID_LOG_DEBUG, "函数:set_led_value", "开始设置0/1控制亮灭:%d",status); |
|---|
| | | |
|---|
| | | //设置GPIO18的值 |
|---|
| | | ret = gpiod_line_set_value(line18, status);//设置输出状态 |
|---|
| | | if (ret < 0) { |
|---|
| | | __android_log_print(ANDROID_LOG_DEBUG, "Set On/Off", "Set line output failed. val:%d!",status); |
|---|
| | | |
|---|
| | | return 0; |
|---|
| | | } |
|---|
| | | |
|---|
| | | ret = gpiod_line_get_value(line18); |
|---|
| | | __android_log_print(ANDROID_LOG_DEBUG, "GPIO18的值", "GPIO18的值为:%d!",ret); |
|---|
| | | |
|---|
| | | if (ret == 0) |
|---|
| | | { |
|---|
| | | __android_log_print(ANDROID_LOG_DEBUG, "--LED状态--", "状态为:--打开!--"); |
|---|
| | | } |
|---|
| | | else |
|---|
| | | { |
|---|
| | | { |
|---|
| | | __android_log_print(ANDROID_LOG_DEBUG, "--LED状态--", "状态为:--关闭!--"); |
|---|
| | | } |
|---|
| | | } |
|---|
| | | |
|---|
| | | return 0; |
|---|
| | | } |
|---|
| | | |
|---|
| | | |
|---|
| | | extern "C" |
|---|
| | | JNIEXPORT jint JNICALL |
|---|
| | | Java_com_example_myapplication_HardControl_ledOpen(JNIEnv *env, jclass clazz) { |
|---|
| | | |
|---|
| | | // TODO: implement ledOpen() |
|---|
| | | // __android_log_print(ANDROID_LOG_DEBUG, "LEDDemo", "------native ledOpen-------"); |
|---|
| | | |
|---|
| | | |
|---|
| | | //1、OPEN:打开chipgpio0 |
|---|
| | | chip = gpiod_chip_open_by_name(chipname); |
|---|
| | | |
|---|
| | | if (!chip) { |
|---|
| | | __android_log_print(ANDROID_LOG_INFO, "Open chipgpio0", "Open chip by name failed. name: %s\n", chipname); |
|---|
| | | |
|---|
| | | return 0; |
|---|
| | | } |
|---|
| | | __android_log_print(ANDROID_LOG_DEBUG, "Open chipgpio0", "Successfully opened chip:%s",chipname); |
|---|
| | | |
|---|
| | | //2、获取打开的设备名 |
|---|
| | | chip_name = gpiod_chip_name(chip); |
|---|
| | | __android_log_print(ANDROID_LOG_DEBUG, "gpiod_chip_name", "The GPIO chip name as represented in the kernel: %s",chip_name); |
|---|
| | | |
|---|
| | | //3、获取打开的chipgpio0的引脚个数 |
|---|
| | | line_num = gpiod_chip_num_lines(chip); |
|---|
| | | __android_log_print(ANDROID_LOG_DEBUG, "gpiod_chip_num_lines", "Line number:%u",line_num); |
|---|
| | | |
|---|
| | | //4、获取GPIO18引脚句柄 |
|---|
| | | line18 = gpiod_chip_get_line(chip,line_num_18); |
|---|
| | | if ( !line18 ) |
|---|
| | | { |
|---|
| | | __android_log_print(ANDROID_LOG_DEBUG, "gpiod_chip_get_line", "Get line failed. line_num: %u",line_num_18); |
|---|
| | | |
|---|
| | | return 0; |
|---|
| | | } |
|---|
| | | |
|---|
| | | //5、判断GPIO18是否被占用 |
|---|
| | | isused = gpiod_line_is_used(line18); |
|---|
| | | if (isused) |
|---|
| | | { |
|---|
| | | // GPIO线正在被使用 |
|---|
| | | __android_log_print(ANDROID_LOG_DEBUG, "GPIO18 isused", "GPIO18线正在被使用"); |
|---|
| | | return 0; |
|---|
| | | } |
|---|
| | | else |
|---|
| | | { |
|---|
| | | // GPIO线没有被使用 |
|---|
| | | __android_log_print(ANDROID_LOG_DEBUG, "GPIO18 is not used", "GPIO18线没有被使用"); |
|---|
| | | } |
|---|
| | | |
|---|
| | | //6、设置GPIO18为输出模式 |
|---|
| | | ret = gpiod_line_request_output(line18,NULL ,1); |
|---|
| | | if (ret < 0) { |
|---|
| | | __android_log_print(ANDROID_LOG_DEBUG, "设置为输出模式", "输出模式设置失败"); |
|---|
| | | |
|---|
| | | return 0; |
|---|
| | | } |
|---|
| | | __android_log_print(ANDROID_LOG_DEBUG, "设置为输出模式", "输出模式设置成功!"); |
|---|
| | | |
|---|
| | | return 2; |
|---|
| | | } |
|---|
| | | |
|---|
| | | |
|---|
| | | extern "C" |
|---|
| | | JNIEXPORT jint JNICALL |
|---|
| | | Java_com_example_myapplication_HardControl_ledCtrl_1on(JNIEnv *env, jclass clazz, jint which, |
|---|
| | | jint status) { |
|---|
| | | // TODO: implement ledCtrl_on() |
|---|
| | | |
|---|
| | | __android_log_print(ANDROID_LOG_DEBUG, "ledCtrl_on", "status 值:%d",status); |
|---|
| | | |
|---|
| | | set_led_value(status); |
|---|
| | | |
|---|
| | | return 0; |
|---|
| | | } |
|---|
| | | extern "C" |
|---|
| | | JNIEXPORT jint JNICALL |
|---|
| | | Java_com_example_myapplication_HardControl_ledCtrl_1off(JNIEnv *env, jclass clazz, jint which, |
|---|
| | | jint status) { |
|---|
| | | // TODO: implement ledCtrl_off() |
|---|
| | | |
|---|
| | | __android_log_print(ANDROID_LOG_DEBUG, "ledCtrl_off", "status 值:%d",status); |
|---|
| | | |
|---|
| | | set_led_value(status); |
|---|
| | | |
|---|
| | | return 0; |
|---|
| | | } |
|---|
| | | |
|---|
| | | extern "C" |
|---|
| | | JNIEXPORT jint JNICALL |
|---|
| | | Java_com_example_myapplication_HardControl_ledCtrl_1close(JNIEnv *env, jclass clazz) { |
|---|
| | | // TODO: implement ledCtrl_close() |
|---|
| | | |
|---|
| | | set_led_value(1); |
|---|
| | | |
|---|
| | | gpiod_line_release(line18); |
|---|
| | | |
|---|
| | | gpiod_chip_close(chip); |
|---|
| | | |
|---|
| | | } |
|---|
| | | ``` |
|---|
| | | |
|---|
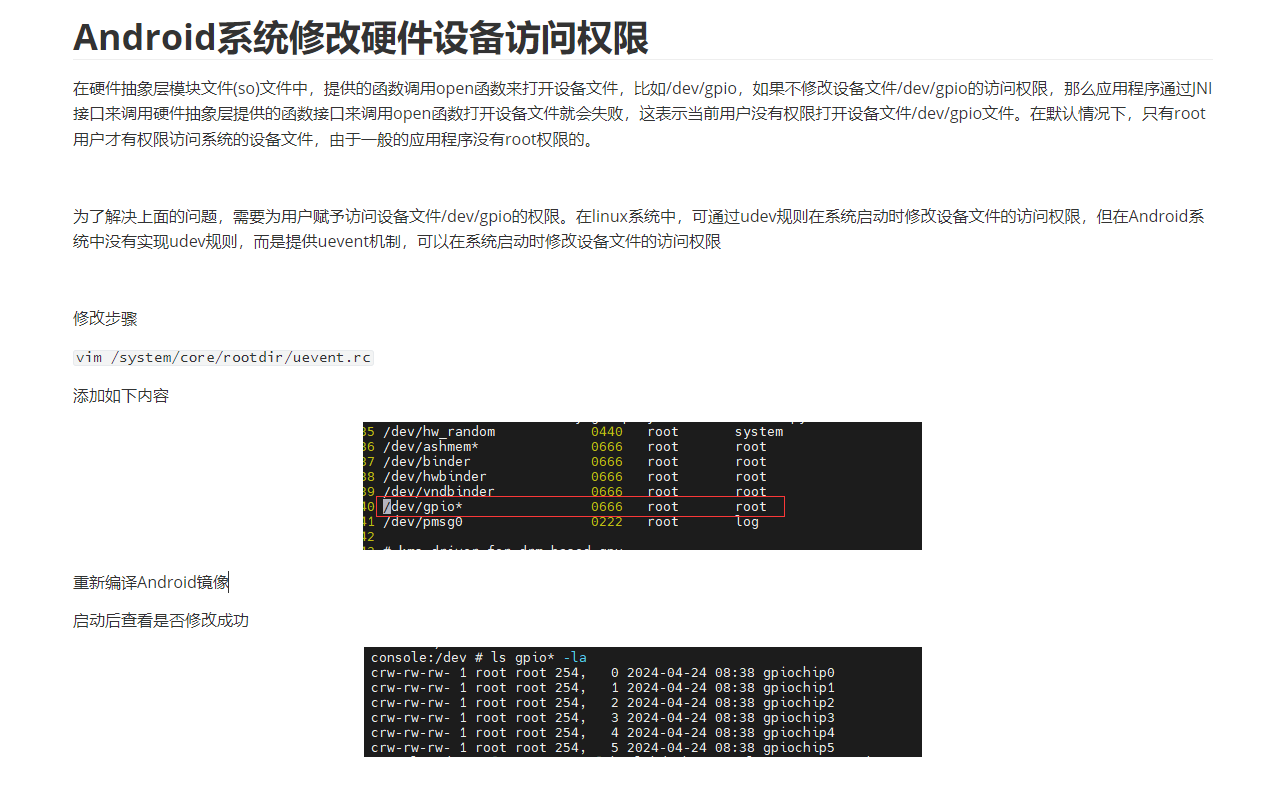
| | | #### 2.3.1 gpiochip0开权限 |
|---|
| | | |
|---|
| | | - app默认是以普通用户运行,但/dev/gpiochip0的权限默认为为600,需要修改为666才能控制,修改之后重新烧录镜像 |
|---|
| | | |
|---|
| | |  |
|---|
| | | |
|---|
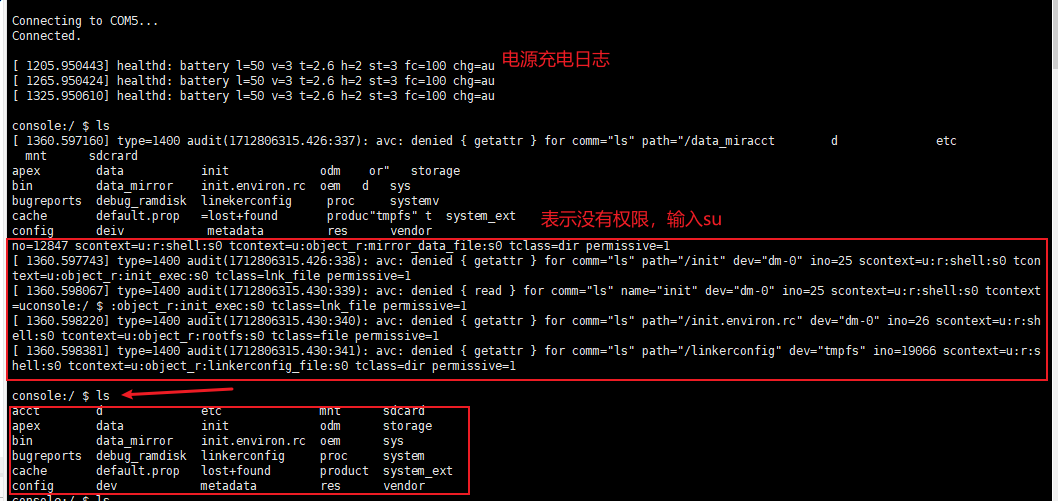
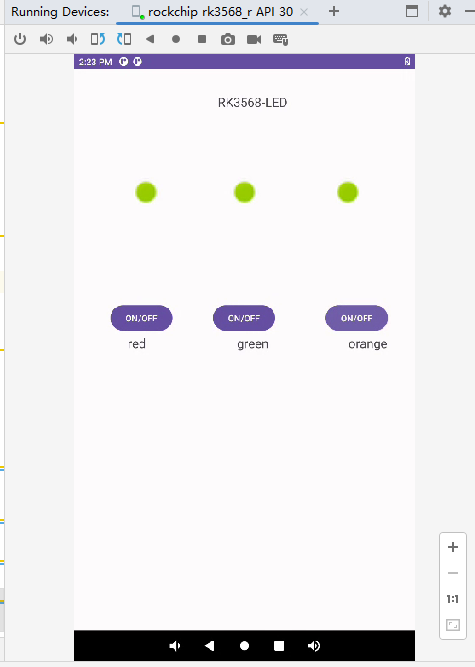
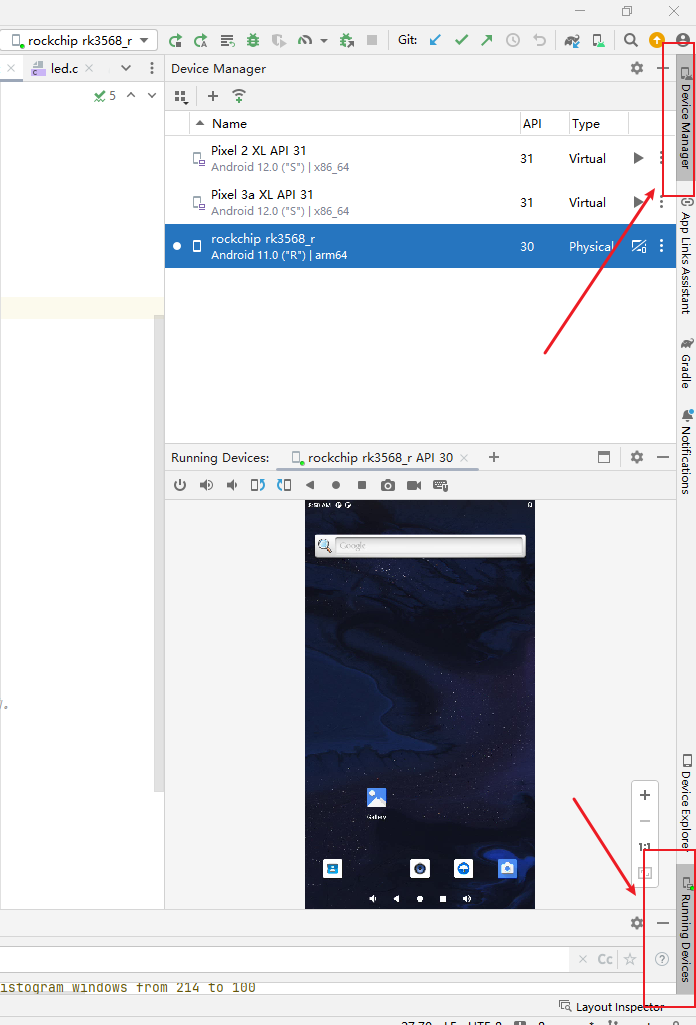
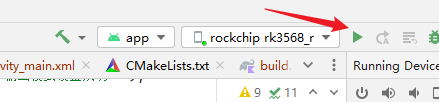
| | | #### 2.3.2 编译运行程序 |
|---|
| | | |
|---|
| | |  |
|---|
| | | |
|---|
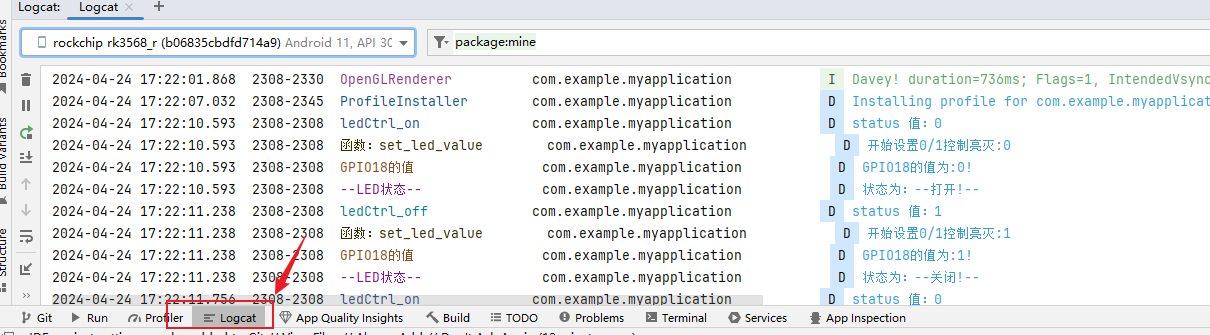
| | | - 可以通过Logcat查看运行日志 |
|---|
| | | |
|---|
| | |  |
|---|
| | | |
|---|
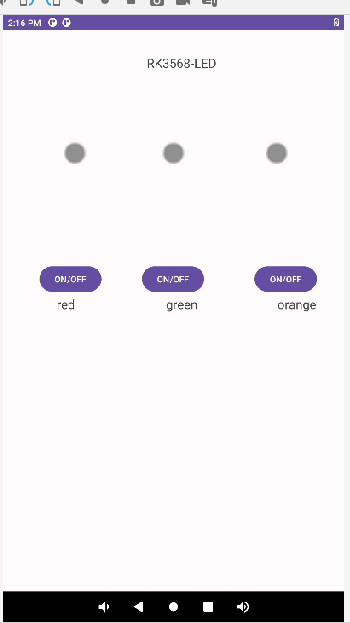
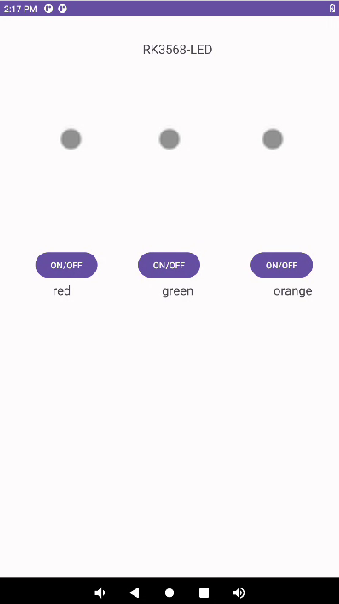
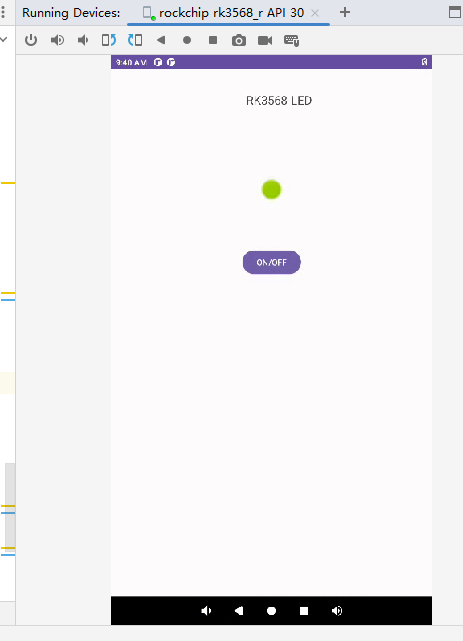
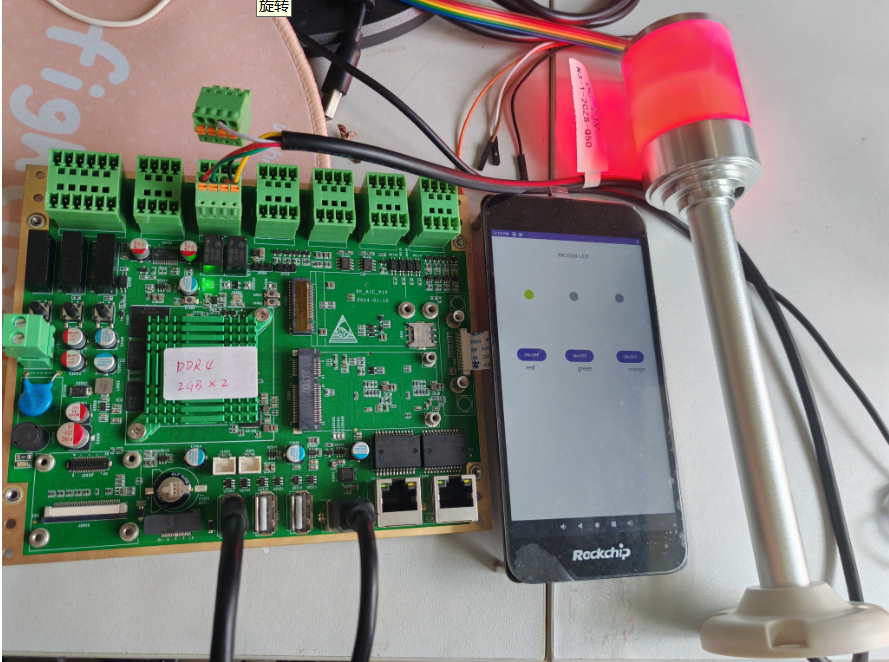
| | | - app界面,点击控制led灯亮灭 |
|---|
| | | |
|---|
| | |  |
|---|
| | | |
|---|
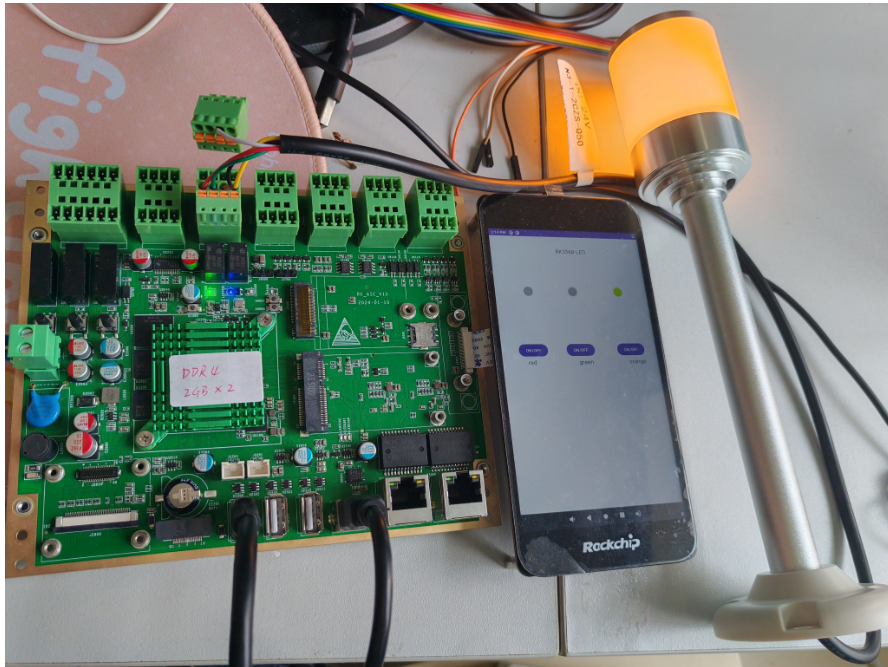
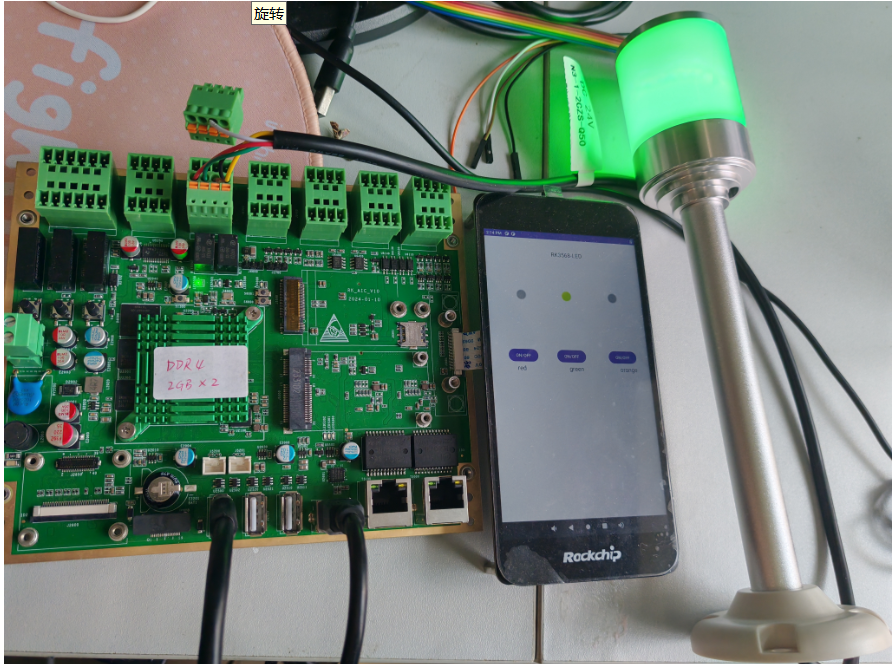
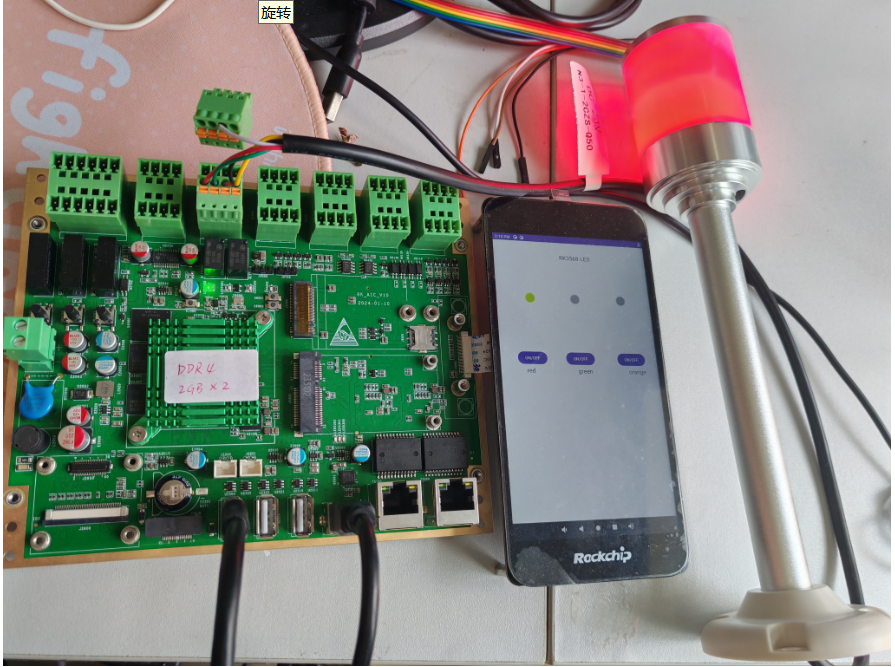
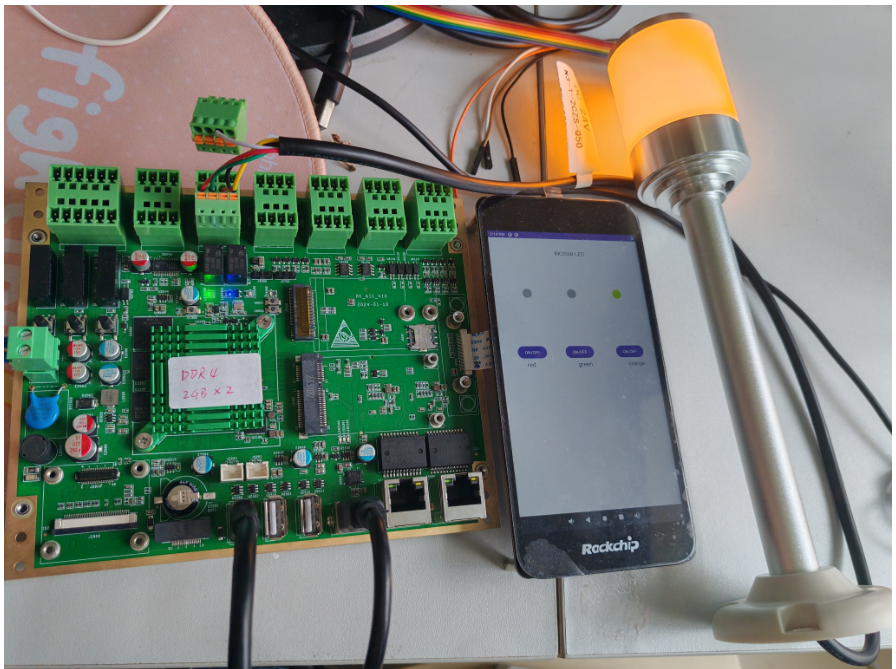
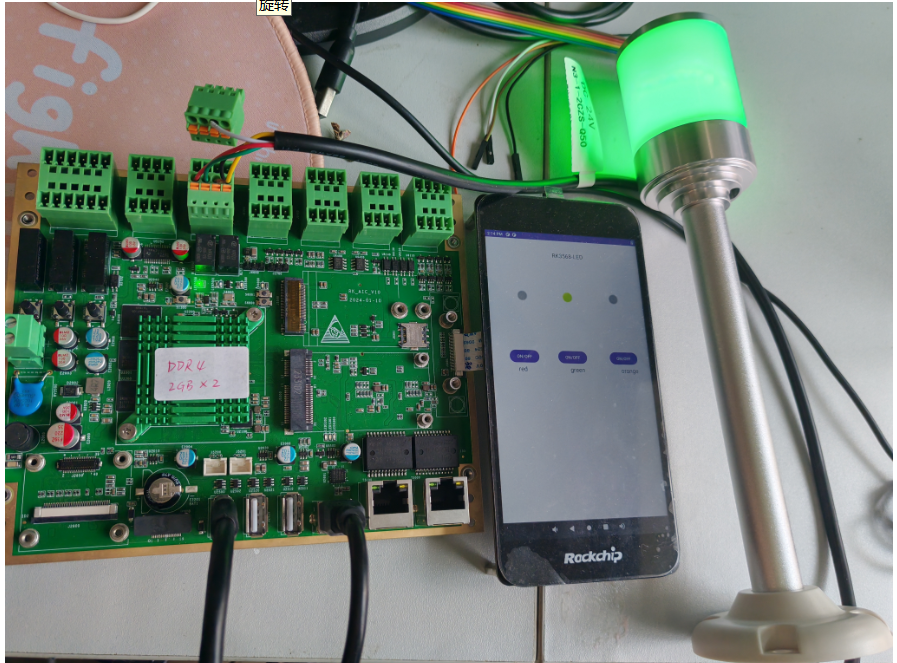
| | | - 运行结果 |
|---|
| | | |
|---|
| | | <img src="./images/image-20240426164804753.png" alt="image-20240426164804753" style="zoom:33%;" /><img src="./images/image-20240426165118487.png" alt="image-20240426165118487" style="zoom:33%;" /> |
|---|
| | | |
|---|
| | | <img src="./images/image-20240426165136395.png" alt="image-20240426165136395" style="zoom: 67%;" /> |
|---|
| | | |
|---|
| | | ------ |
|---|
| | | |
|---|
| | | ## 附:烧录镜像 |
|---|
| | | |
|---|
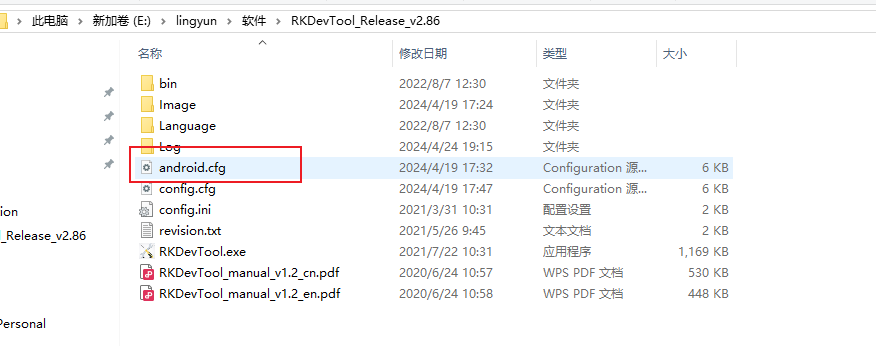
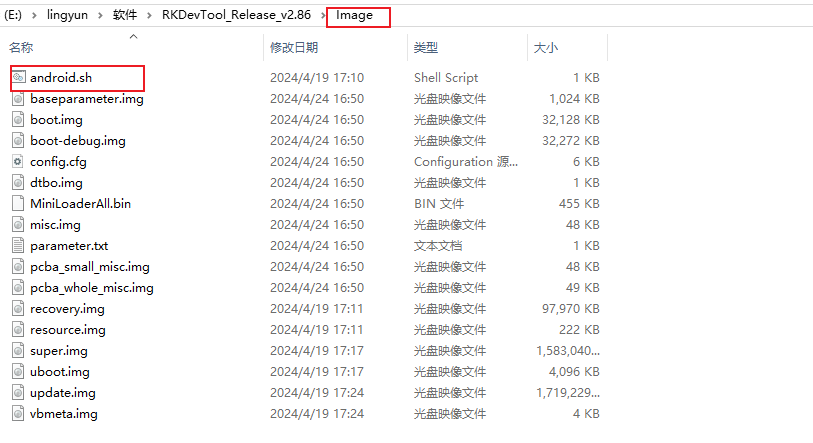
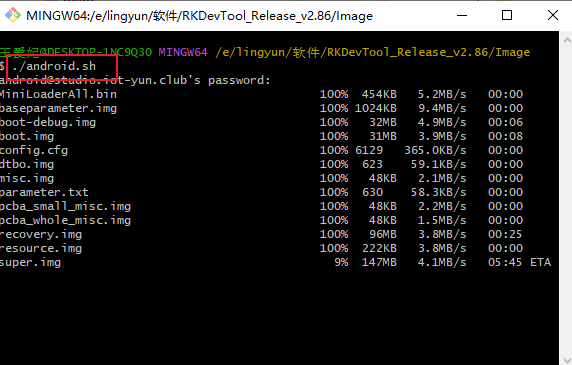
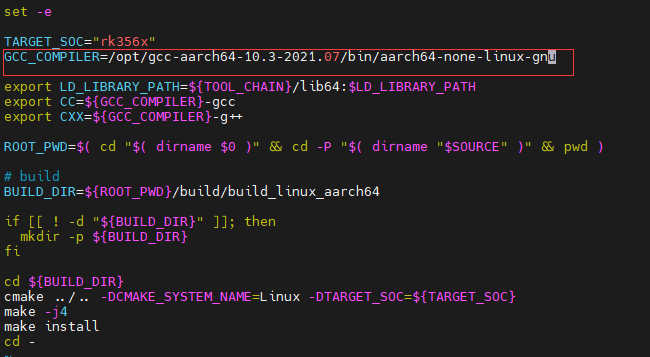
| | | - **image**目录下,运行android脚本 |
|---|
| | | |
|---|
| | |  |
|---|
| | | |
|---|
| | |  |
|---|
| | | |
|---|
| | | |
|---|
| | | |
|---|
| | | - 打开软件,空白处右键,导入配置 |
|---|
| | | |
|---|
| | |  |
|---|
| | | |
|---|
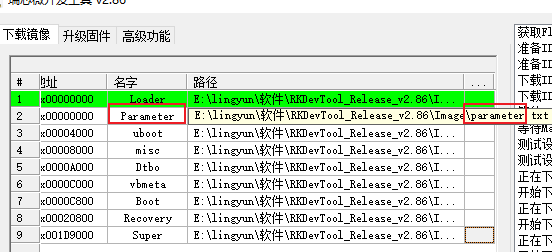
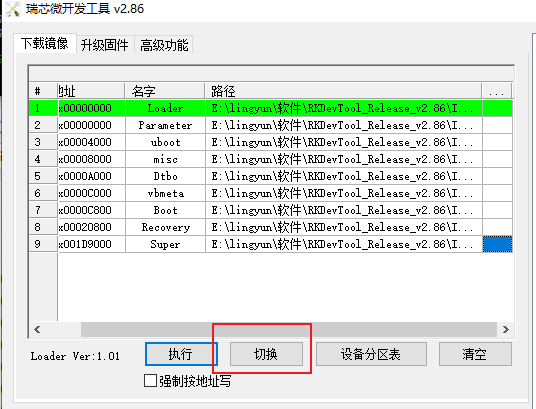
| | | - 双击这些空白格,把镜像路径设置一下,Loader就是选取.bin结尾的文件,其它的对应文件名 |
|---|
| | | |
|---|
| | |  |
|---|
| | | |
|---|
| | | |
|---|
| | | |
|---|
| | | - 点击切换 |
|---|
| | | |
|---|
| | |  |
|---|
| | | |
|---|
| | | |
|---|
| | | |
|---|
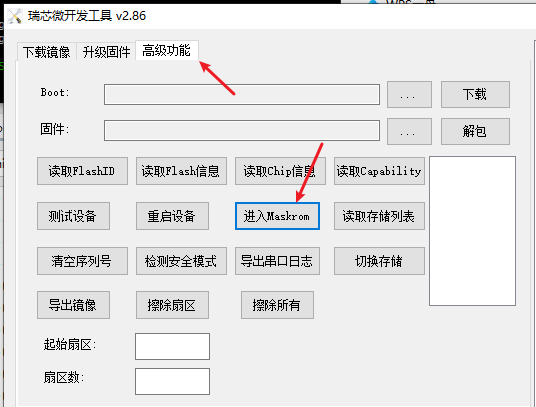
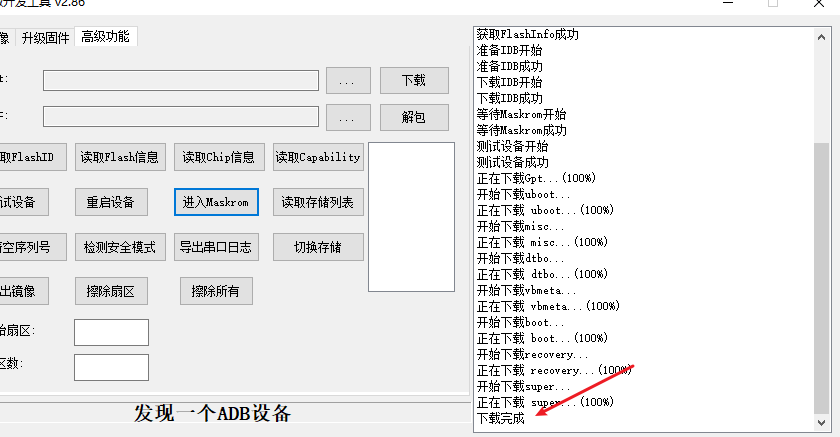
| | | - 点击高级功能,进入Maskrom |
|---|
| | | |
|---|
| | |  |
|---|
| | | |
|---|
| | | - 下载完成后会自动重启,再点复位按键重启 |
|---|
| | | |
|---|
| | |  |
|---|
| | | |
|---|
| | |  |
|---|
| | | |
|---|
| | | |
|---|
| | | |
|---|


